The first couple of times I tried quinoa, I thought it tasted like (felt like?) wet birdseed in my mouth! Seriously... I kid you not! Okay, that was several years ago and I suppose I just wasn't in the right "place" for it, if you know what I mean. Just like we tell our kids all the time, your tastes definitely change over time, and sometimes we actually start to seek out the things we used to avoid. I desperately wanted to like it because it's crazy healthy for you, so over those years, I'd give it a try here and there when someone had a cool looking recipe that didn't look bland.
Recently, my daughter and I were at an early morning farmer's market where a local company was sampling out one of their quinoa recipes. Another chance for me to have a free sample, no risk. They had a delicious southwest quinoa, but to my dismay, I heard myself (like from above) telling the salesperson "Maybe you could have added x or y or z?" Oh my LORD!!! 😳 That's my Mama in me, y'all! I mean, it was delicious, but I knew it could be better. On another note, I have some family members with some health concerns, so I'm trying to get some great tasting, healthy recipes together. I'm hoping they will try this fantastic and healthy side dish! *See Food Nerd Notes at bottom of post for information about quinoa.
#glutenfree #diabeticfriendly #cleaneating Options for #vegetarian #vegan #dairyfree #highprotein #healthy #sidedish #salad #southwestern #highfiber
Ingredients: (6 servings)
- 3/4 cup quinoa
- I used an organic rainbow heirloom quinoa
- 1 1/2 c chicken stock
- sub vegetable stock if desired
- 1/2 tsp kosher salt
- 1/2 c kidney beans, drained and rinsed
- 1/2 c black beans, drained and rinsed
- 1/2 c purple onions, diced
- 1 c roasted corn kernels
- about 2 ears of fresh corn
- 1/2 c cherry tomatoes, halved
- 1/4 c green onion tops, chopped
- 1/4 c cilantro, rough chopped
Dressing
- 1/4 c fresh squeezed lime juice
- 1/4 c extra virgin olive oil (EVOO)
- 2 Tbsp red wine vinegar
- 1 tsp ground cumin
- 1/2 tsp chipotle chili powder
- 1/2 tsp kosher salt
Topping
- queso fresco, crumbled
- omit for vegan, dairyfree
Step-by-Step:
The first thing I'd like to say, other than "gather up your ingredients," is that anything that starts off with ingredients this bright, vibrant and beautiful is sure to be a winner! This automatically fits in to the "eat the rainbow" category, so we can feel confident that we are doing something good for ourselves and our families. Also, you can make this vegan or vegetarian friendly by leaving off the cheese and swapping out the chicken broth for vegetable broth or water. This recipe is also gluten free, for those of you who need that for your dietary needs.
Begin by rinsing your quinoa in cool water until the water is clear. Check your package. Use a good quality quinoa to get a great tasting recipe! This organic rainbow heirloom quinoa came from Bolivia. Strain in a fine mesh sieve or strainer.
 |
| 3/4 c quinoa being rinsed in water |
Combine the rinsed/drained quinoa with chicken stock and start bringing stock to a boil.
 |
1 1/2 c chicken stock (or vegetable stock or water)
You may need additional salt if you substitute water. |
Add kosher salt to quinoa. (you should probably wait until it's almost at a boil)
 |
| 1/2 tsp kosher salt |
Once the quinoa comes to a boil, turn it down to a simmer for about 20 minutes according to package directions. You will see it start to "spiral out" and it will become soft.
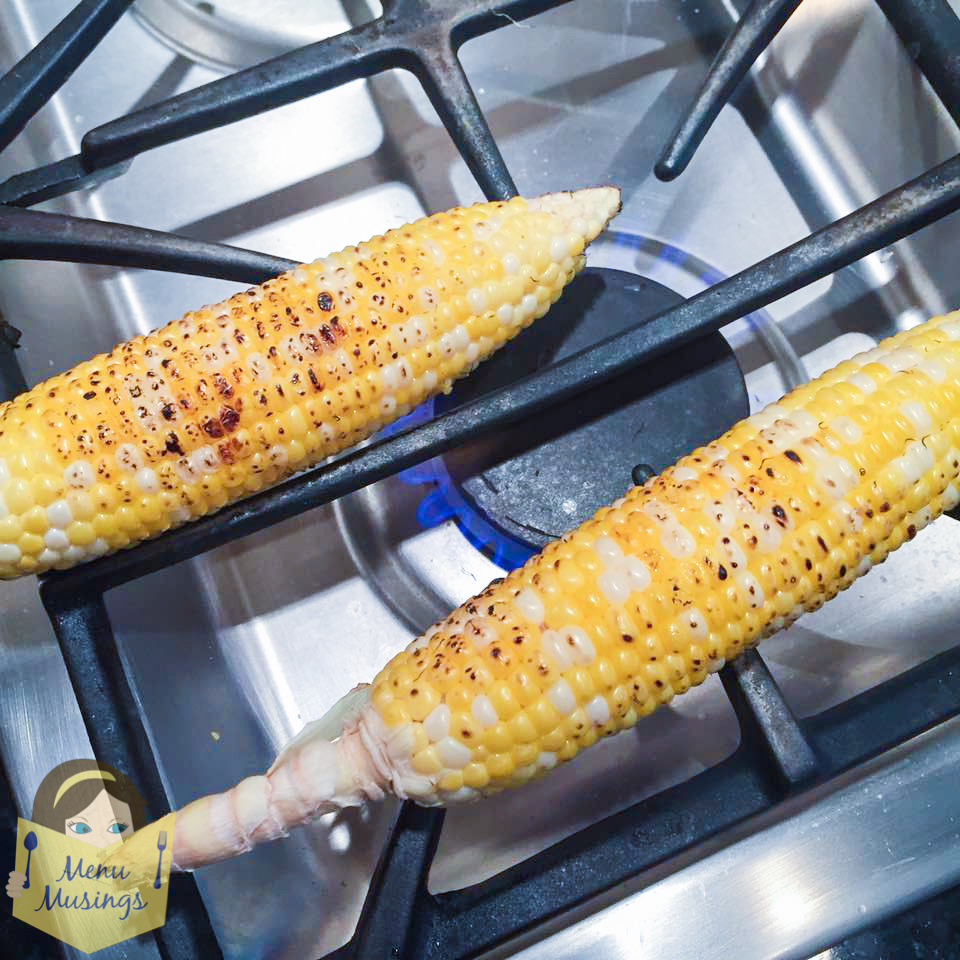
While waiting for quinoa to come to a boil, roast corn. I just used my long handled tongs and put them right on the stove. You can do them on the grill if you'd like (it was raining outside when I did this).
If you need to use canned corn kernels, you can drain them well, let them dry a bit on a couple sheets of paper towels, and lay them out on a single layer on a sheet pan with a bit of EVOO and put them under the broiler for a few minutes. You have to watch them, but this will do the trick.
 |
| roasting the corn |
Set the roasted corn cobs aside to cool for a while.
When the quinoa is cooked, drain and fluff. Now we are ready to just dump everything in there. I know, it looks like there's not a lot of product there, but as this is a salad, we are going to add a bunch to it! As always, make this your recipe! Feel free to add, delete, change quantities etc as you see fit to make it perfect for your palate!
 |
| The cooked, drained quinoa |
Here we go! Dump in all your stuff!
 |
| 1/2 cup drained, rinsed kidney beans |
 |
| 1/2 cup drained, rinsed black beans |
 |
| 1/2 cup chopped purple onions |
 |
| 1/2 cup chopped red bell pepper |
 |
| 1 cup roasted corn kernels that we cut off of the two cobs |
 |
1/4 chopped green onions
If you aren't a fan of cilantro, perhaps add more green onions |
 |
1/4 c coarsely chopped cilantro
To me, it's not Mexican without cilantro! |
 |
| 1/2 cup halved grape tomatoes |
Let's give our "naked salad" a stir and see what we've got!
 |
| our salad so far |
Now let's make the dressing:
It's just a matter of whisking together the ingredients and adjusting the seasoning to your liking.
 |
| 1/4 c fresh squeezed lime juice |
 |
| 1/4 c EVOO |
 |
| 2 Tbsp red wine vinegar |
 |
| 1 tsp ground cumin |
*The chipotle chili powder does pack a bit of heat, so keep that in mind. It also has a little smokiness to it. You can substitute regular chili powder if you prefer.
 |
| 1/2 tsp chipotle chili powder |
 |
| 1/2 tsp kosher salt |
Just pour the dressing over the salad.
(*
I actually made a second batch of dressing to marinate my chicken breasts in.)
It may seem pretty "wet," but the quinoa needs to sit for a few hours (even better if you let it sit until the next day), and you don't want it to be dry after it soaks up the dressing.
When ready to serve, garnish the top by crumbling up some queso fresco cheese on top. I added a bit of cilantro and extra lime just to brighten it up. This would be fantastic to take on a picnic as well, since there are no dairy products like mayo to spoil.
This recipe has tons of healthful nutrition in it - fiber, vitamins, protein, a variety of textures.. you name it! And last but not least... it's delicious!
This southwestern flavored quinoa made a fantastic side dish for my chili lime marinated/grilled chicken and fresh green beans. There is nothing processed on this whole plate.
I hope you enjoyed this recipe!
Here are some more recipes I think you'll love!
A salad that's been around since the '30's must have something going for it, right? And this easy and delicious peppercorn ranch is sure to become your family's favorite! Just throw everything in the food processor and that's it!
Pork and fruit are a classic combination, and this topping is one I bet you're going to love! Isn't it fun to try new things?
Who doesn't love pot stickers? These are so much fun to make with your family! Just don't turn your back when they are done... they disappear fast!
So easy to make for even the newest baker. Pretend you know what you are doing! Great for that party you forget you needed to take something to.
Speaking of party food, who doesn't love poppers! Delish!!!! And always a hit!
Food Nerd Notes:
Quinoa is considered one of the world's "superfoods." Quinoa has been cultivated for around 5,000 years by the Incas when they realized that it was good for human consumption. They considered it "Incan Gold" for their warriors as they believed it to improve their stamina. The health benefits of this gluten free pseudo-cereal has long been known, and include the following:
1 - It is a one of the most protein rich foods you can eat. It is complete protein containing all nine essential amino acids.
2 - Quinoa is iron rich. Iron is the basis of hemoglobin formation and assists in oxygen delivery to the muscles and the brain. Iron is also involved in the synthesis of neurotransmitters, regulation of body temperature, enzyme activity and energy metabolism.
3 - Quinoa contains lysine. Lysine is important in tissue growth and repair.
4 - Quinoa is rich in magnesium. Magnesium plays a role in relaxation of blood vessels which can reduce migraines. Magnesium also helps maintain blood sugar control which can help reduce Type 2 diabetes.
5 - Quinoa is high in Riboflavin (B2) - B2 improves energy metabolism in the brain and muscle cells and thus improves energy production in the cells.
6 - Quinoa has high levels of manganese - Manganese is an antioxidant that helps prevent mitochondrial damage during energy production, as well as protecting your red blood cells and other cells against free radical damage.
7 - Quinoa contains almost twice as much fiber as other grains. Fiber is widely known to relieve constipation. However, fiber also assists in lowering cholesterol, glucose levels and thus diabetes and heart disease.
One-fourth cup of dry quinoa contains 160 calories, 2.5 grams of fat (0 grams saturated and trans fat), 0 grams of cholesterol and sodium, 27 grams of carbohydrate (3 grams of fiber and 0 grams of sugar), and 6 grams of protein.
Written Method:
The first thing I'd like to say, other than "gather up your ingredients," is that anything that starts off with ingredients this bright, vibrant and beautiful is sure to be a winner! This automatically fits in to the "eat the rainbow" category, so we can feel confident that we are doing something good for ourselves and our families. Also, you can make this vegan or vegetarian friendly by leaving off the cheese and swapping out the chicken broth for vegetable broth or water. This recipe is also gluten free, for those of you who need that for your dietary needs.
Begin by rinsing your quinoa in cool water until the water is clear. Check your package. Use a good quality quinoa to get a great tasting recipe! This organic rainbow heirloom quinoa came from Bolivia. Strain in a fine mesh sieve or strainer.
Combine the rinsed/drained quinoa with chicken stock and start bringing stock to a boil.
Add kosher salt to quinoa. (you should probably wait until it's almost at a boil)
Once the quinoa comes to a boil, turn it down to a simmer for about 20 minutes according to package directions. You will see it start to "spiral out" and it will become soft.
While waiting for quinoa to come to a boil, roast corn. I just used my long handled tongs and put them right on the stove. You can do them on the grill if you'd like (it was raining outside when I did this).
Set the roasted corn cobs aside to cool for a while.
If you need to use canned corn kernels, you can drain them well, let them dry a bit on a couple sheets of paper towels, and lay them out on a single layer on a sheet pan with a bit of EVOO and put them under the broiler for a few minutes. You have to watch them, but this will do the trick.
When the quinoa is cooked, drain and fluff.
Now we are ready to just dump everything in there.
As always, make this your recipe! Feel free to add, delete, change quantities etc as you see fit to make it perfect for your palate!
Here we go! Just dump in all your stuff!
Now let's make the dressing:
It's just a matter of whisking together the ingredients and adjusting the seasoning to your liking.
*The chipotle chili powder does pack a bit of heat, so keep that in mind. It also has a little smokiness to it. You can substitute regular chili powder if you prefer.
Just pour the dressing over the salad. It may seem pretty "wet," but the quinoa needs to sit for a few hours (even better if you let it sit until the next day), and you don't want it to be dry after it soaks up the dressing.
When ready to serve, garnish the top by crumbling up some queso fresco cheese on top. I added a bit of cilantro and extra lime just to brighten it up. This would be fantastic to take on a picnic as well, since there are no dairy products like mayo to spoil.
This recipe has tons of healthful nutrition in it - fiber, vitamins, protein, a variety of textures.. you name it! And last but not least... it's delicious!


 #glutenfree #sidedish #easy #lowcarb #healthy
 #glutenfree #sidedish #easy #lowcarb #healthy