Sunday, August 26, 2012

German Style Soft Pretzels - Two Ways

What a strange weekend this has been.  All the kids were here, so I was looking for something fun to do with them.  I thought it would be fun to make a couple of different types of soft pretzels.  Like the ones that you can find at large county fairs and some of your local malls.  Turns out, besides Lily, no one else wanted to spend any time with the grown-ups.. so we made them alone.  Well, I guess life is just like that sometimes. 


The lowdown - These do take some time (with the resting, rising, and refrigeration time), but the steps are really easy (and God knows, I'm always terrified of 'dough' recipes).  The resulting color and textures were really nice, similar to a chewy bagel.  We made two varieties, a traditional salted one and a sweet one topped with a brown sugar almond crunch. 

Click for Printable Recipe 
Ingredients:

  • 3 3/4 cups bread flour, plus more for flouring board surface 
  • 1 1/2 cups warm water
  • 1 1/4 tsp active dry yeast
  • 2 tsp kosher salt
  • 2 Tbsp softened butter
  • 8 cups water for boiling
  • 1/2 cup baking soda
  • coarse salt for sprinkling
topping for sweet pretzels -
  • 1/4 cup butter
  • 2 Tbsp local honey
  • 1/4 cup slivered almonds, chopped fine
  • 1/8 cup granulated sugar
  • 1/8 cup packed brown sugar


 Step-by-step
In the bowl of a standing electric mixer, fitted with the dough hook attachment, combine 3 3/4 cup bread flour with 2 tsp kosher salt, 1 1/4 tsp active dry yeast, 2 Tbsp softened butter, and the 1 1/2 cups warm water.  Knead at medium speed until the flour is evenly moistened, about 2 minutes. Increase the speed to high and knead until a smooth, elastic dough forms around the hook, around 8 minutes.

3 3/4 cups bread flour
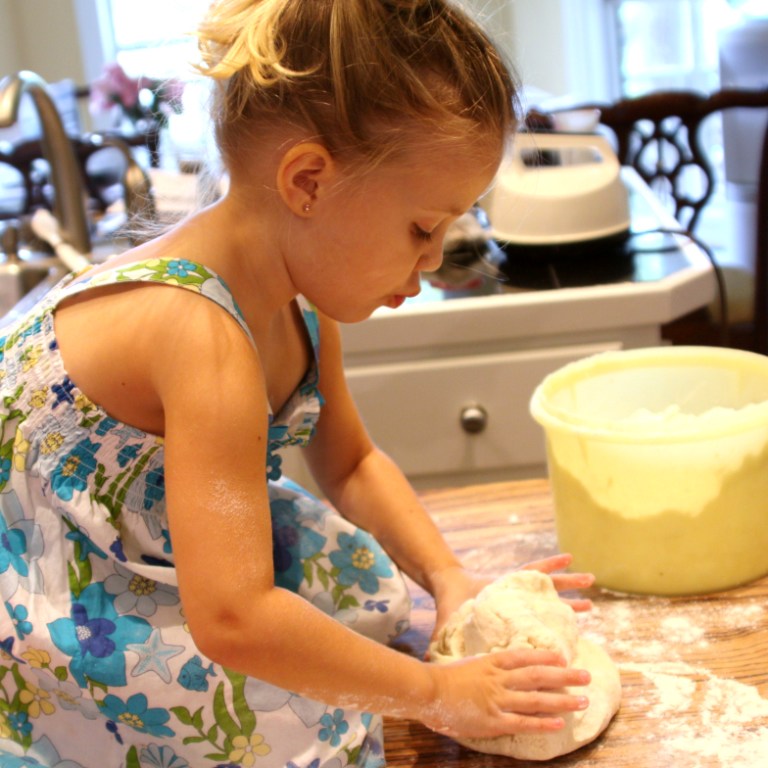
I marvel at the amount of things she already knows about cooking!
 
2 Tbsp softened butter

2 tsp kosher salt

1 1/4 tsp active dry yeast

1 1/2 cups warm water

2 minutes on med to mix, then 8 minutes on high to knead with the dough hook
Transfer the dough to a lightly floured surface.  Cover loosely with a dry kitchen towel and let it rest for 5 minutes. Cut the dough into 8 equal pieces and form each one into a ball. Cover the dough balls with the towel and let rest another 5 minutes.
Transfer the dough to a lightly floured surface.

Cover loosely with a dry kitchen towel and let it rest for 5 minutes.

Cut the dough into 8 equal pieces.
Form each one into a ball

Cover the dough balls with the towel and let rest another 5 minutes.
On an unfloured surface, roll each ball into a long rope with tapered ends, around 18 - 22 inches long.
To shape each pretzel, form the rope into a U shape. Cross the ends over each other twice to form the twist, then bring the ends up to the bottom of the U and press the tips into it.  Arrange the pretzels on two large baking sheets lined with parchment paper and let stand uncovered in a warm place for 45 minutes until slightly risen. Refrigerate the pretzels uncovered for at least 2 hours or overnight.
On an unfloured surface, roll each ball into a long rope with tapered ends, around 18 - 22 inches long.

To shape each pretzel, form the rope into a U shape. Cross the ends over each other twice to form the twist.

Bring the ends up to the bottom of the U and press the tips into it.

Rope....

Twist....

Arrange the pretzels on two large baking sheets lined with parchment paper.

Let stand uncovered in a warm place for 45 minutes until slightly risen. Can you tell the difference?
Preheat the oven to 400 degrees F.  Dissolve 1/2 cup baking soda in 2 quarts of boiling water (8 cups).  Gently lower and boil the pretzels in the water for 30 seconds, flipping them halfway through. Remove them and drain briefly on a drying rack, then return them to the parchment paper lined baking sheet.  
Dissolve 1/2 cup baking soda in 2 quarts of boiling water (8 cups). 

Gently lower and boil the pretzels in the water for 30 seconds, flipping them halfway through.
Remove them and drain briefly on a drying rack, then return them to the parchment paper lined baking sheet. 
For salted pretzels, salt them and bake them now.  Bake them on the top and middle racks until shiny brown (about 16 minutes), shifting the position of the pans halfway through. Let them cool slightly on drying racks before serving.  Optional - if serving immediately, you may like to brush the tops with melted butter.  Yum.  Buttery, salty, good!

Salt them and bake them now.

Bake them on the top and middle racks until shiny brown (about 16 minutes), shifting the position of the pans halfway through.

Optional - if serving immediately, you may like to brush the tops with melted butter.

Mmmm....
For sweet pretzels, bake them "naked."  While baking, make a honey butter glaze with the 1/4 cup melted butter and 2 Tbsp honey.  Separately, finely chop the almonds, dry toast them in a pan, and mix the nuts with equal parts 1/4 cup granulated sugar and 1/4 cup brown sugar.  After they are baked, brush with the honey butter, sprinkle on the topping, and bake for an additional 3 - 5 minutes to slightly caramelize the sugar on top.  I served these with a icing glaze of confectioner's sugar, a bit of vanilla, a squeeze of lemon juice, and some cream to the desired consistency. 
 
For sweet pretzels, bake them "naked."
Finely chop the almonds, dry toast them in a pan.

Make a honey butter glaze with the 1/4 cup melted butter and 2 Tbsp honey.

Mix the nuts with equal parts 1/4 cup granulated sugar and 1/4 cup brown sugar.

Brown sugar almond crunch topping!!
After they are baked, brush with the honey butter... 

sprinkle on the topping...

...and bake for an additional 3 - 5 minutes to slightly caramelize the sugar on top.


I served these with a icing glaze (confectioner's sugar, a bit of vanilla, a squeeze of lemon juice, and some cream to the desired consistency).

Order the Menu Musings Cookbook!


Food Nerd Notes - 
Let's talk about the boiling.  Boiling the pretzels for about 30 seconds makes the interior of the pretzel quickly “puff” and begins the crust formation. If you don’t boil, you’ll lose out on the chewiness you’d expect from a pretzel.  You find this same principle with bagels.

Baking soda is very alkaline ingredient.  Sometimes it is mixed with flour and combined with an acid in baked goods, where it neutralizes the acid, creates carbon dioxide bubbles, and causes the baked good to rise. In this case, it is bathing the exterior of the pretzels, so the purpose is different.  We are not trying to increase the rise of the pretzels, we are increasing the alkalinity of the outside of the pretzel.  Here, the alkaline water allows browning of the pretzel to occur at a lower temperature (thanks to the Maillard reaction, for all of you science buffs).  By allowing the browning to to happen more easily, you don't have to bake the pretzel nearly as long to achieve the brown exterior. So if you baked the pretzel long enough to get the brown color on the outside without the alkaline environment, you would impact the texture significantly. So basically, the baking soda gives the pretzel the brown, shiny crust and imparts a distinctive flavor and aroma as well. 

So what happens if you skip the “boiling in water + baking soda” step?  Your texture, flavor, and appearance will all be rather anemic.  Without the alkali bath, you would basically just have a cute bread stick. So go for it.  It does not increase your prep time by much, and it's awfully fun to see the water bubble up when you add the baking soda. 

I tried to research the history of the pretzel, which I assume originated somewhere in Germany. I found this story from The History of the Pretzel on kitchenproject.com.... (which basically means that we really are not sure of the origins except that this is a pretty ancient food):
 
The pretzel may have originated as early as 610AD at a monastery somewhere in Southern France or Northern Italy, where monks used scraps of dough and formed them into strips to represent a child's arms folded in prayer. The three empty holes represented the Christian Trinity.  The monks offered the warm, doughy bribe to children who had memorized their Bible verses and prayers. The monks called it a Pretiola, Latin for little reward. From there, the pretzel transformed into the Italian word, Brachiola, which means little arms.


The Pretiola journeyed beyond the French and Italian wine regions, hiked the Alps, wandered through Austria, and crossed into Germany, where it became known as the Bretzel or Pretzel.

In medieval times merchants traveling to the Frankfurt Fair risked being robbed by bandits. In order to guard the tradesmen, the towns' people would ride out, greet the vendors and offer them pewter pitchers of wine and loads of crisp dough on their spears, called Geleit-pretzels.

The Whimsical Pretzel shape worked its way into the culture not only as a reward but as a symbol of Good Luck and prosperity. I suppose it had the same effect as a logo did appearing in festivals and celebrations, as well as a quick snack available from street corner vendors. Probably two of the most fascinating things about the pretzel is it was served on Easter with 2 hard boiled eggs and hidden around the farms, for the kids to find. This very likely was the forerunner of the Easter egg hunt. Weddings in Europe for a time used the tradition of the bride and groom tugging at a pretzel like a wishbone, the larger piece assured the spouses fulfillment of their wishes.
 
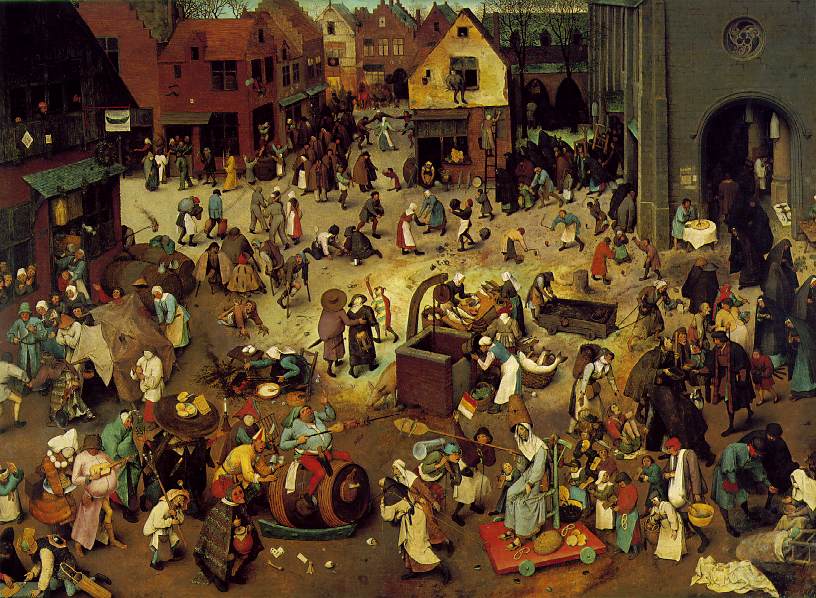
There are pictures of pretzels in paintings that help us to find how old their existence really is. Here is a one of the more famous pictures in which we find pretzels, called "The f ight between carnival and lent" by Pieter Bruegel in 1559. You can see the pretzels around the woman on the red cart in the lower right hand corner.

Click here to Subscribe to MenuMusings so you won't miss a thing!

Looking for more recipes?
Please visit my Recipe Index for tons of great recipes to cook for/with your family!  Some things are made from leftovers to stretch your budget, others are totally from scratch, while others make use of convenience items for a semi-homemade meal.  I also have a wide array of ethnic recipes represented.  Here are a few to pique your curiosity:

Written Directions
In the bowl of a standing electric mixer, fitted with the dough hook attachment, combine 3 3/4 cup bread flour with 2 tsp kosher salt, 1 1/4 tsp active dry yeast, 2 Tbsp softened butter, and the 1 1/2 cups warm water.  Knead at medium speed until the flour is evenly moistened, about 2 minutes. Increase the speed to high and knead until a smooth, elastic dough forms around the hook, around 8 minutes.
Transfer the dough to a lightly floured surface.  Cover loosely with a dry kitchen towel and let it rest for 5 minutes. Cut the dough into 8 equal pieces and form each one into a ball. Cover the dough balls with the towel and let rest another 5 minutes.
On an unfloured surface, roll each ball into a long rope with tapered ends, around 18 - 22 inches long.
To shape each pretzel, form the rope into a U shape. Cross the ends over each other twice to form the twist, then bring the ends up to the bottom of the U and press the tips into it.  Arrange the pretzels on two large baking sheets lined with parchment paper and let stand uncovered in a warm place for 45 minutes until slightly risen. Refrigerate the pretzels uncovered for at least 2 hours or overnight.
Preheat the oven to 400 degrees F.  Dissolve 1/2 cup baking soda in 2 quarts of boiling water (8 cups).  Gently lower and boil the pretzels in the water for 30 seconds, flipping them halfway through. Remove them and drain briefly on a drying rack, then return them to the parchment paper lined baking sheet.
For salted pretzels, salt them and bake them now.  Bake them on the top and middle racks until shiny
brown (about 16 minutes), shifting the position of the pans halfway through. Let them cool slightly on drying racks before serving.  Optional - if serving immediately, you may like to brush the tops with melted butter.  Yum.  Buttery, salty, good!
For sweet pretzels, bake them "naked."  While baking, make a honey butter glaze with the 1/4 cup melted butter and 2 Tbsp honey.  Separately, finely chop the almonds, dry toast them in a pan, and mix the nuts with equal parts 1/4 cup granulated sugar and 1/4 cup brown sugar.  After they are baked, brush with the honey butter, sprinkle on the topping, and bake for an additional 3 - 5 minutes to slightly caramelize the sugar on top.  I served these with a icing glaze of confectioner's sugar, a bit of vanilla, a squeeze of lemon juice, and some cream to the desired consistency.

Thursday, August 16, 2012

Steamed Asian Dumplings (Gyoza)


Well, so much for specificity in the title, huh?  I have tried to research the origin of these dumplings, and have managed to come across a myriad of stories, names, and explanations from multiple Asian cultures - Chinese, Japanese, Vietnamese, Cantonese, Korean....  At the very least, it seems everyone wants to claim a piece of these little guys.  And who wouldn't?  These fragrant, tender little dumplings are nothing short of delicious!  We've probably all had them in one form or another at some point, whether they were steamed, fried, boiled, or simmered in a sauce.  In reading the description from the various cultures, these seem to be most closely aligned with the Chinese steamed dumplings, rather than the Japanese (which use a wonton dough that is quite a bit thinner).

Regardless, I think these are great.  Truthfully, they are a bit time consuming, but not difficult to make at all.  That said, the steps could definitely be broken down into several make-ahead parts and assembled later, or assembled early and frozen or cooked later.  All the sites I visited reported that the home made dough tastes so much better than using pre-made wontons, so we thought we would give it a whirl.  I have watched several chefs on television fret over making the crimps and folds just right, etc., which just makes everyone scared to attempt them.  I figured the worst that could happen is that we would make a huge mess and laugh about it later.  No harm, no foul.  But actually it was a lot of fun! We were VERY pleased with the outcome, the authenticity, the texture and flavors.. and just plain proud of our little dumplings. 
            Couldn't resist adding in a photo of this angelic face helping me out.

So next time you have some time with your kids, grandkids, neighbors, or friends, just make some! Good times, skills learning, and making memories with the kids is ALWAYS worth it!

Oh, and one more thing - These share little resemblance to some of the deep fried, greasy dumplings that I've had in some of the restaurants.  Steaming the dumplings is a totally fat free step, and you can add as many healthy veggies as you want to them!  Even my oldest teenager, who won't go near a vegetable, loved them... and he even looked inside and saw the green and orange.  Ha!  There's a new miracle each day!

Want to see me make them as a video?  Click here for my YouTube tutorial on making these.  They are easier than you think!             My Video Tutorial for making Steamed Asian Dumplings (Gyoza)

Ingredients:

Dough -
  • 4 cups all purpose flour (plus more for working and rolling dough)
  • 1 3/4 cups boiling water
  • 1/2 tsp salt
Filling -
  • 1 pound of ground pork
  • 2 Tbsp + 1 tsp fresh ginger, minced fine
  • 1 Tbsp + 1 tsp sesame oil
  • 2 Tbsp soy sauce
  • 2 Tbsp dried apricots, minced fine
  • a small handful of green onions, chopped fine (~ 1/4 cup)
  • 1 large carrot, grated
  • 2-3 cups napa cabbage
  • 1/2 - 1 tsp salt
  • optional - black pepper to taste
Dipping Sauce -
  • 1/3 cup soy sauce
  • 1/3 cup rice wine vinegar
  • 1 tsp sesame oil
  • 1 Tbsp brown sugar
  • 1/3 cup chopped green onions or chives
  • * optional - Sriracha chili sauce for heat if you would like.

 Step-by-step
A. PREP -
Dough: In a stainless steel bowl, mix 4 cups flour and 1/2 tsp salt. Slowly add boiling water to flour in 1/4 cup increments. Mix until a ball is formed and the dough is not too hot to handle. On a floured surface, knead the dough until it becomes a smooth, elastic ball. This took me about 10 minutes. Place back in bowl and cover with a damp cloth.  Allow to rest for at least 1 hour.
Like any good scientist, Lily was learning how to level off the measuring cup for an accurate measurement.   

Add the 4 cups flour to a large stainless steel bowl.

Add the 1/2 tsp salt to the flour.


Add the 1 3/4 cups boiling water to the flour and salt. 

Mix and mix.  The original recipes say to mix with chopsticks.  That is probably over my head, so we Americanized this step with a spoon.
Our initial dough ball.  See how rough and grainy it is?  Time to get to kneading.
Knead, push, fold over, turn 90 degrees, repeat. Again and again.


LOTS and LOTS of kneading.  About 10 minutes.

Our final dough ball.  Much smoother, silkier, and more elastic now.

Cabbage:  Chop the cabbage and sprinkle with the 1/2 tablespoon of salt.  Allow it to stand for 30-45 minutes to draw out the water. Place the cabbage on a clean dishtowel and squeeze out any water (just like when using frozen spinach). The dryer the cabbage the better.
2 - 3 cups of Napa cabbage, chopped fairly small.

Sprinkle 1/2 - 1 tsp salt over the chopped Napa cabbage.  Let it sit 30 - 40 minutes.

After 30 - 40 minutes or so, collect the cabbage in a clean kitchen towel and squeeze out the water.

That is the water coming out of the Napa cabbage.

The Napa cabbage, wilted and with all the water squeezed out.  See how wet the towel is?
Filling: Combine ground pork, ginger, apricots, green onions, carrots, and wilted cabbage in a non-stick skillet.  Break up the pork into small pieces while it is cooking.  Add in the soy sauce and sesame oil and continue cooking until pork is cooked through.  Check for seasoning.  I think I also added a sprinkling of black pepper at the end.  Turn off the heat and allow to cool so that you can handle it.
1 pound ground pork.

Start the pork cooking first.  You do not need cooking oil.

Fresh ginger.  Mmmm... can you smell it?!

Finely minced fresh ginger. 2 Tbsp + 1 tsp fresh ginger, minced fine

One large carrot, peeled and grated

Grated carrot
The wilted, squeezed Napa cabbage

chopped green onions

2 Tbsp chopped, dried apricots

2 Tbsp Soy sauce

1 Tbsp + 1 tsp Sesame Oil
Sauce:
Combine all ingredients and serve in a small bowl.
Our dipping sauce. 1/3 cup soy sauce, 1/3 cup rice wine vinegar, 1 tsp sesame oil, 1/3 cup green onions, 1 Tbsp brown sugar
B. ASSEMBLY - 
Working on a floured surface with floured hands, cut the dough into several large chunks that are of manageable sizes.  Roll out the dough to to form long 'noodles,' about 1-inch in diameter. Cut the dough into 1/2-inch pieces and turn them over so the cut sides are facing up. Flatten them with your palm and roll out thin using a rolling pin. The dumpling wrappers should end up about 3-4 inches in diameter.
Our "noodle" would have wrapped around the kitchen, so we cut it into chunks first.

Trying to get our bearings to see where our cuts would be.

Cut into 1/2" pieces

Smash them with your hand

Roll out thin

We ended up making them 3 - 4 " in diameter.
Place a small mound (1-2 tsp) of filling in the middle of the wrapper, being very careful not to touch the edges with the filling (this will prevent proper sealing of the dumplings). Wet one edge of the wrapper, and fold in half over the filling to form a half moon shape. Starting on one end fold/pinch the wrapper tightly together. We found this worked better if we wet these edges as well.  Proceed with this fold/pinch method until the dumpling is completely sealed. Some directions instructed that we should expect 10 to 14 folds per dumpling.  Ha!  Don't worry about how many you get.  This isn't Iron Chef and no one is judging you.  Have fun!  Allow the dumplings to rest with the folded edge straight up.  My son got creative with his shapes and made several unique designs that we enjoyed.
Load the fillings. 1 - 1 1/2 tsp filling.

Don't stress over this.  Just have fun!

At this point, you can cover them and put them in the fridge to cook later, or even freeze them.  If you freeze them, I recommend laying them out separately in a single layer on a sheet pan to freeze, then placing them in a zip top freezer bag.  If you put them in a bag while the dough is still a bit sticky, you may end up with one big giant dumpling clump!  Not attractive.

C. COOK -
Add a small amount of water to the bottom of a wok (around 1 inch).  Set the bamboo steamer down into the water.  The water level should almost, but not quite, touch the bottom level of the steamer. 

Line the steamer "trays" with Napa cabbage.  This prevents the dumplings from sticking to the steamer.  The steam will go up through the cabbage.  I was worried about this.  But it worked like a charm.
Line with Napa cabbage first
Place dumplings on the cabbage and cover with the second filled "tray" and the cover. 
Allow the water to boil so that steam will rise up through the bamboo steamer.  I steamed the dumplings for around 10 minutes (once it really started steaming). 
Load up the trays

10 minutes of steaming
I asked around at my local Asian market if you could just use an electric steamer (like the one I use for broccoli).  He said "Yes, you can; although it will not taste quite the same.  The bamboo steamer is partly responsible for giving it its own unique flavor."  Right now, I'm pretty darned happy about the $11 that I spent on the bamboo steamer.  What a great price for authenticity!!
Serve on a bed of napa cabbage with the dipping sauce on the side.  


Delicious!  Light.  Flavorful.  Tender.  NOT greasy!
Lily LOVES using chopsticks... but she is also quick with a Plan B helping hand action!
Click here to Subscribe to MenuMusings so you won't miss a thing!

Written Directions
A. PREP -
Dough: In a stainless steel bowl, mix 4 cups flour and 1/2 tsp salt. Slowly add boiling water to flour in 1/4 cup increments. Mix until a ball is formed and the dough is not too hot to handle. On a floured surface, knead the dough until it becomes a smooth, elastic ball. This took me about 10 minutes. Place back in bowl and cover with a damp cloth.  Allow to rest for at least 1 hour.
Cabbage:  Chop the cabbage and sprinkle with the 1/2 tablespoon of salt.  Allow it to stand for 30-45 minutes to draw out the water. Place the cabbage on a clean dishtowel and squeeze out any water (just like when using frozen spinach). The dryer the cabbage the better.
Filling: Combine ground pork, ginger, apricots, green onions, carrots, and wilted cabbage in a non-stick skillet.  Break up the pork into small pieces while it is cooking.  Add in the soy sauce and sesame oil and continue cooking until pork is cooked through.  Check for seasoning.  I think I also added a sprinkling of black pepper at the end.  Turn off the heat and allow to cool so that you can handle it.
Sauce:  Combine all ingredients and serve in a small bowl.
B. ASSEMBLY - 
Working on a floured surface with floured hands, cut the dough into several large chunks that are of manageable sizes.  Roll out the dough to to form long 'noodles,' about 1-inch in diameter. Cut the dough into 1/2-inch pieces and turn them over so the cut sides are facing up. Flatten them with your palm and roll out thin using a rolling pin. The dumpling wrappers should end up about 3-4 inches in diameter.
Place a small mound (1-2 tsp) of filling in the middle of the wrapper, being very careful not to touch the edges with the filling (this will prevent proper sealing of the dumplings). Wet one edge of the wrapper, and fold in half over the filling to form a half moon shape. Starting on one end fold/pinch the wrapper tightly together. We found this worked better if we wet these edges as well.  Proceed with this fold/pinch method until the dumpling is completely sealed. Some directions instructed that we should expect 10 to 14 folds per dumpling.  Ha!  Don't worry about how many you get.  This isn't Iron Chef and no one is judging you.  Have fun!  Allow the dumplings to rest with the folded edge straight up.  My son got creative with his shapes and made several unique designs that we enjoyed.
At this point, you can cover them and put them in the fridge to cook later, or even freeze them.

C. COOK -
Add a small amount of water to the bottom of a wok (around 1 inch).  Set the bamboo steamer down into the water.  The water level should almost, but not quite, touch the bottom level of the steamer. 
Line the steamer "trays" with Napa cabbage.  This prevents the dumplings from sticking to the steamer.  The steam will go up through the cabbage.  I was worried about this.  But it worked like a charm.
Place dumplings on the cabbage and cover with the second filled "tray" and the cover. 
Allow the water to boil so that steam will rise up through the bamboo steamer.  I steamed the dumplings for around 10 minutes (once it really started steaming). 
I asked around at my local Asian market if you could just use an electric steamer (like the one I use for broccoli).  He said "Yes, you can; although it will not taste quite the same.  The bamboo steamer is partly responsible for giving it its own unique flavor."  Right now, I'm pretty darned happy about the $11 that I spent on the bamboo steamer.  What a great price for authenticity!!
Serve on a bed of napa cabbage with the dipping sauce on the side. 


Footnote -While I was in graduate school, my major professor was Dr Yuan Luo.  Dr Luo, who was from China, made us many dumplings over the course of the years we worked together.  Her dumplings had a way of making those long lab meetings a lot more enjoyable, and brought us all together - regardless of the multiple cultural personalities working together.  This is where I really learned to love these tasty bites.  I can't believe it took me this long to attempt them on my own!

Dr Luo - If you are reading this... thank you.  You taught me so much!  Your encouragement and confidence in me meant so much... and I still remember you saying "Julie, Make a plan."  I wish you were here to taste these and give me some feedback.

Follow me on Pinterest

Follow Me on Pinterest