
I'm just going to put it right out there that the only salmon I'm a fan of is the wild Alaskan sockeye. I really don't care for the farm raised Atlantic type. For one, the wild Alaskan sockeye has a higher omega-3 content which makes it more heart healthy. Additionally, I just prefer the taste. But you feel free to use whatever you enjoy. You are the one cooking. It's your kitchen! By the way, this meal is so easy my kids could put it together. It's also super healthy and very quick, coming in at the 30-minute mark! My kids told me that we've had this so many times now that it's time to put it on the blog for everyone. So here it is.
*FYI - To pin any of the photos, hover of them and the PinIt logo will appear in the upper left portion of the photo.
Print this Recipe!
 Ingredients: (for 4 servings)
First go ahead and get your oven preheating to 375F. Grab some pieces of aluminum foil. Parchment paper won't work for this because of the butter sauce and we'll be putting it under the broiler. You'll need pieces that are about 12" x 14" or so to make these individual packets. The foil needs to be large enough to fold over the and seal the fish and veggies.
In a small bowl or measuring cup, mix together the butter, fresh lemon juice and minced garlic. I just threw it in the microwave for a minute to melt the butter and combine the ingredients.

 Pour the melted butter mixture over the salmon. You may want to bend up the edges so none of your sauce will run out.
 Season liberally with salt, pepper, oregano and red pepper flakes. Add fresh dill if you'd like. Add thinly sliced lemon slices cut in half.
Fold up each side of the foil over the salmon, making a double fold over the top. Then fold in the ends, making sure each is well sealed and the sauce does not leak. You also want to leave room on top of each filet to allow the steam to circulate.
*FYI - To pin any of the photos, hover of them and the PinIt logo will appear in the upper left portion of the photo.
Print this Recipe!
 Ingredients: (for 4 servings)
- 4 individual wild Alaskan sockeye salmon filets
- Juice of 1 large lemon (~ 2 Tbsp)
- 2 tsp garlic, minced very fine
- 4 Tbsp melted butter
- 1/2 tsp kosher salt
- 1/4 tsp black pepper
- 1/4 tsp dried oregano
- 1/4 tsp red pepper flakes
- 1 - 2 lemon slices per filet for baking
- 1 Tbsp chopped parsley for garnish
- Optional fresh dill
First go ahead and get your oven preheating to 375F. Grab some pieces of aluminum foil. Parchment paper won't work for this because of the butter sauce and we'll be putting it under the broiler. You'll need pieces that are about 12" x 14" or so to make these individual packets. The foil needs to be large enough to fold over the and seal the fish and veggies.
In a small bowl or measuring cup, mix together the butter, fresh lemon juice and minced garlic. I just threw it in the microwave for a minute to melt the butter and combine the ingredients.
 |
| 4 Tbsp melted butter + 2 Tbsp fresh lemon juice |
 |
| 2 tsp finely minced garlic |
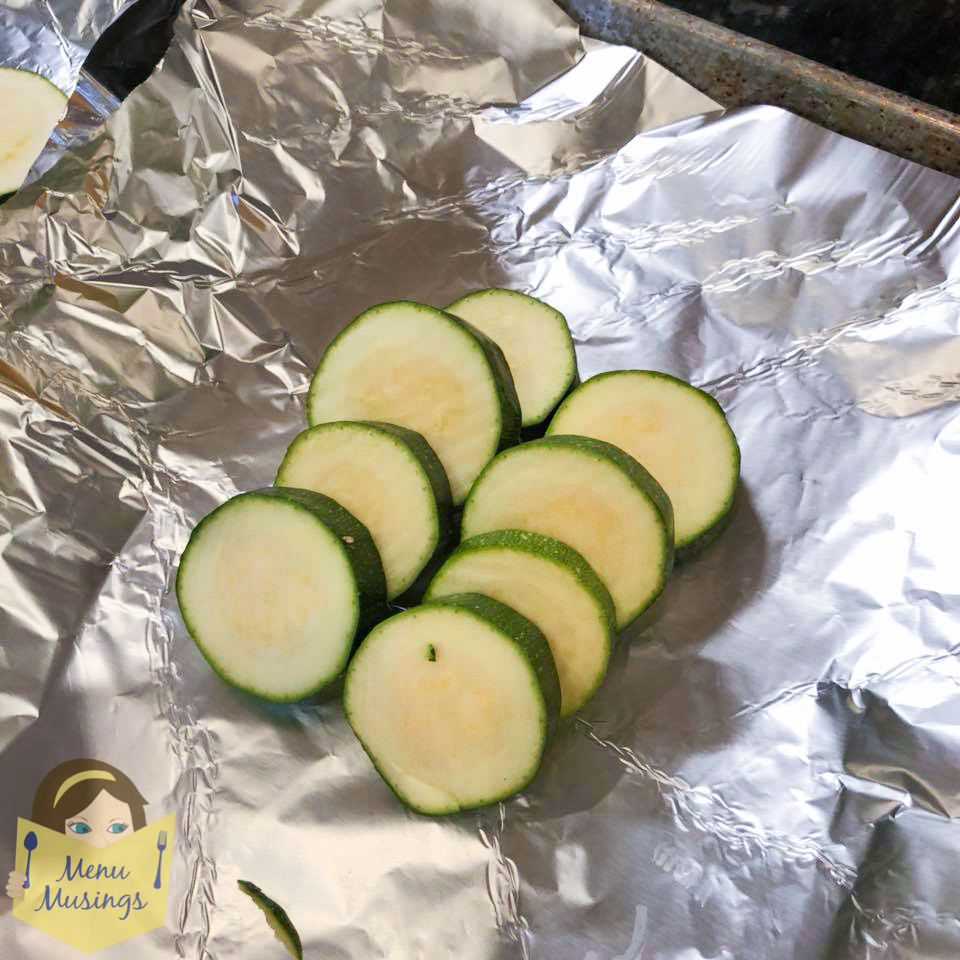
If you have any veggies you need to use up, grab them out of the fridge. I used some zucchini. An onion or carrots sliced thinly would work, too. I didn't want my fish to stick to the aluminum foil. Turn your foil so that the dull side is facing up and the shiny side is facing down. Place the veggies on the foil or at least spray it with nonstick cooking spray. Place the salmon on the veggies.


 |
| kosher salt + black pepper + dried oregano + crushed red pepper flakes |
 |
| thinly sliced lemons |


Place your filets in the oven and bake until for around 20 - 22 minutes.

Open the salmon packets carefully. Turn the oven on broil for about 3 minutes and return the fish to the oven.

Remove packets from the oven. The salmon should flake easily with a fork. You may want to spoon some of the sauce from the bottom of the packet over the top of the salmon and sprinkle some chopped parsley over the top to garnish.

Just an FYI: This is how it looks if you want to make a bunch of it for a whole family. This is about 2 1/2 pounds of fresh wild Alaskan sockeye salmon. This is how I do it if I'm making if for all of us. Just adjust the amounts and basically double everything. *I actually prefer it with the chopped dill as you see in the family style salmon below, but today I somehow left that item off of my grocery list. Ughh!
 Serve your cooked filets with roasted vegetables, rice/quinoa, salad, you name it!
 Serve to some people you love!

 I hope you have enjoyed this easy, family friendly, healthy entree recipe.
Here are some bonus recipes!
Indian Chicken Korma - Indian food is one of my favorite guilty pleasures. The heat is toned down in this one so that even children can enjoy it. One of my kids' favorites!
 Mozzarella Stuffed 3-Meat Italian Meatballs - delicate, melt in your mouth tender, yet super tender. Make them with or without the mozzarella. These freeze SO well!
 Lemon Zucchini Muffins - Even my veggiephobe son liked these! Score!
 Korean BBQ Shish Kabobs - You may want to make extra. My kids demolish these in like 10 minutes!
 Creole Red Snapper - So moist and flavorful and SUPER easy! One of my favorite fish recipes!
 Written Method:


Here are some bonus recipes!
Indian Chicken Korma - Indian food is one of my favorite guilty pleasures. The heat is toned down in this one so that even children can enjoy it. One of my kids' favorites!


First go ahead and get your oven preheating to 375F. Grab some pieces of aluminum foil. Parchment paper won't work for this because of the butter sauce and we'll be putting it under the broiler. You'll need pieces that are about 12" x 14" or so to make these individual packets. The foil needs to be large enough to fold over and seal the fish and veggies.
In a small bowl or measuring cup, mix together the butter, fresh lemon juice and minced garlic. I just threw it in the microwave for a minute to melt the butter and combine the ingredients. If you have any veggies you need to use up, grab them out of the fridge. (Zucchini, onions or carrots sliced thinly work great.) You don't want the fish to stick to the aluminum foil. Turn your foil so that the dull side is facing up. Place the veggies on the foil or at least spray it with nonstick cooking spray. Place the salmon on the veggies.
Pour the melted butter mixture over the salmon. You may want to bend up the edges so none of your sauce will run out. Season liberally with salt, pepper, oregano and red pepper flakes. Add fresh dill if you'd like. Add thinly sliced lemon slices cut in half. Fold up each side of the foil over the salmon, making a double fold over the top. Then fold in the ends, making sure each is well sealed and the sauce does not leak. You also want to leave room on top of each filet to allow the steam to circulate.
In a small bowl or measuring cup, mix together the butter, fresh lemon juice and minced garlic. I just threw it in the microwave for a minute to melt the butter and combine the ingredients. If you have any veggies you need to use up, grab them out of the fridge. (Zucchini, onions or carrots sliced thinly work great.) You don't want the fish to stick to the aluminum foil. Turn your foil so that the dull side is facing up. Place the veggies on the foil or at least spray it with nonstick cooking spray. Place the salmon on the veggies.
Place your filets in the oven and bake until for around 20 - 22 minutes. Open the salmon packets carefully. Turn the oven on broil for about 3 minutes and return the fish to the oven. Remove packets from the oven. The salmon should flake easily with a fork. You may want to spoon some of the sauce from the bottom of the packet over the top of the salmon and sprinkle some chopped parsley over the top to garnish.
FYI: If you are making a bunch of it for a whole family and can purchase the whole fresh filets, I usually use two whole filets. This is about 2 1/2 - 3 pounds of fresh wild Alaskan sockeye salmon. Just adjust the amounts and basically double everything. Serve your cooked filets with roasted vegetables, rice/quinoa, salad, you name it!


