Step-by-step
In the bowl of a standing electric mixer, fitted with the dough hook attachment, combine 3 3/4 cup bread flour with 2 tsp kosher salt, 1 1/4 tsp active dry yeast, 2 Tbsp softened butter, and the 1 1/2 cups warm water. Knead at medium speed until the flour is evenly moistened, about 2 minutes. Increase the speed to high and knead until a smooth, elastic dough forms around the hook, around 8 minutes.
 |
| 3 3/4 cups bread flour |
 |
| I marvel at the amount of things she already knows about cooking! |
 |
| 2 Tbsp softened butter |
 |
| 2 tsp kosher salt |
 |
| 1 1/4 tsp active dry yeast |
 |
| 1 1/2 cups warm water |
 |
| 2 minutes on med to mix, then 8 minutes on high to knead with the dough hook |
Transfer the dough to a lightly floured surface. Cover loosely with a dry kitchen towel and let it rest for 5 minutes. Cut the dough into 8 equal pieces and form each one into a ball. Cover the dough balls with the towel and let rest another 5 minutes.
 |
| Transfer the dough to a lightly floured surface. |
 |
| Cover loosely with a dry kitchen towel and let it rest for 5 minutes. |
 |
| Cut the dough into 8 equal pieces. |
 |
| Form each one into a ball |
 |
| Cover the dough balls with the towel and let rest another 5 minutes. |
On an unfloured surface, roll each ball into a long rope with tapered ends, around 18 - 22 inches long.
To shape each pretzel, form the rope into a U shape. Cross the ends over each other twice to form the twist, then bring the ends up to the bottom of the U and press the tips into it. Arrange the pretzels on two large baking sheets lined with parchment paper and let stand uncovered in a warm place for 45 minutes until slightly risen. Refrigerate the pretzels uncovered for at least 2 hours or overnight.
 |
| On an unfloured surface, roll each ball into a long rope with tapered ends, around 18 - 22 inches long. |
 |
| To shape each pretzel, form the rope into a U shape. Cross the ends over each other twice to form the twist. |
 |
| Bring the ends up to the bottom of the U and press the tips into it. |
 |
| Rope.... |
 |
| Twist.... |
 |
| Arrange the pretzels on two large baking sheets lined with parchment paper. |
 |
| Let stand uncovered in a warm place for 45 minutes until slightly risen. Can you tell the difference? |
Preheat the oven to 400 degrees F. Dissolve 1/2 cup baking soda in 2 quarts of boiling water (8 cups). Gently lower and boil the pretzels in the water for 30 seconds, flipping them halfway through. Remove them and drain briefly on a drying rack, then return them to the parchment paper lined baking sheet.
 |
| Dissolve 1/2 cup baking soda in 2 quarts of boiling water (8 cups). |
 |
| Gently lower and boil the pretzels in the water for 30 seconds, flipping them halfway through. |
 |
| Remove them and drain briefly on a drying rack, then return them to the parchment paper lined baking sheet. |
For salted pretzels, salt them and bake them now. Bake
them on the top and middle racks until shiny brown (about 16 minutes),
shifting the position of the pans halfway through. Let them cool
slightly on drying racks before serving. Optional - if serving
immediately, you may like to brush the tops with melted butter. Yum.
Buttery, salty, good!
 |
| Salt them and bake them now. |
 |
| Bake
them on the top and middle racks until shiny brown (about 16 minutes),
shifting the position of the pans halfway through. |
 |
| Optional - if serving
immediately, you may like to brush the tops with melted butter. |
 |
| Mmmm.... |
For sweet pretzels, bake them "naked." While baking, make a honey butter glaze with the 1/4 cup melted butter and 2 Tbsp honey. Separately, finely chop the almonds, dry toast them in a pan, and mix the nuts with equal parts 1/4 cup granulated sugar and 1/4 cup brown sugar. After they are baked, brush with the honey butter, sprinkle on the topping, and bake for an additional 3 - 5 minutes to slightly caramelize the sugar on top. I served these with a icing glaze of confectioner's sugar, a bit of vanilla, a squeeze of lemon juice, and some cream to the desired consistency.
 |
| For sweet pretzels, bake them "naked." |
 |
| Finely chop the almonds, dry toast them in a pan. |
 |
| Make a honey butter glaze with the 1/4 cup melted butter and 2 Tbsp honey. |
 |
| Mix the nuts with equal parts 1/4 cup granulated sugar and 1/4 cup brown sugar. |
 |
| Brown sugar almond crunch topping!! |
 |
| After they are baked, brush with the honey butter... |
 |
| sprinkle on the topping... |
 |
| ...and bake for an additional 3 - 5 minutes to slightly caramelize the sugar on top. |
 |
| I served these with a icing glaze (confectioner's sugar, a bit of
vanilla, a squeeze of lemon juice, and some cream to the desired
consistency). |
Order the Menu Musings Cookbook!
Food Nerd Notes -
Let's talk about the boiling. Boiling the pretzels for about 30 seconds makes the
interior of the pretzel quickly “puff” and begins the crust formation.
If you don’t boil, you’ll lose out on the chewiness you’d expect from a
pretzel. You find this same principle with bagels.
Baking soda is very alkaline ingredient. Sometimes it is mixed with flour and combined with an acid in baked goods, where it neutralizes the acid, creates carbon dioxide bubbles, and causes the baked good to rise. In this case, it is bathing the exterior of the pretzels, so the purpose is different. We are not trying to increase the rise of the pretzels, we are increasing the alkalinity of the outside of the pretzel. Here, the alkaline water allows browning of the pretzel to occur at a lower temperature (thanks to the Maillard reaction, for all of you science buffs). By allowing the
browning to to happen more easily, you don't have to bake the pretzel
nearly as long to achieve the brown exterior. So if you baked the
pretzel long enough to get the brown color on the outside without the
alkaline environment, you would impact the texture significantly. So basically, the baking soda gives the pretzel the brown, shiny crust and imparts a distinctive flavor and aroma as well.
So what happens if you skip the “boiling in water + baking soda” step? Your texture, flavor, and appearance will all be rather anemic. Without the alkali bath, you would basically just have a cute bread stick. So go for it. It does not increase your prep time by much, and it's awfully fun to see the water bubble up when you add the baking soda.
I tried to research the history of the pretzel, which I assume originated somewhere in Germany. I found this story from The History of the Pretzel on kitchenproject.com.... (which basically means that we really are not sure of the origins except that this is a pretty ancient food):
The pretzel may have originated as early as 610AD at a monastery somewhere in Southern France or Northern
Italy, where monks used scraps of dough and formed them into strips to
represent a child's arms folded in prayer. The three empty holes represented
the Christian Trinity. The monks offered the warm, doughy bribe to children who had memorized
their Bible verses and prayers. The monks called it a Pretiola, Latin
for little reward. From there, the pretzel transformed into the Italian
word, Brachiola, which means little arms.
The Pretiola journeyed beyond the French and Italian wine regions, hiked
the Alps, wandered through Austria, and crossed into Germany, where it
became known as the Bretzel or Pretzel.
In medieval times merchants traveling to the Frankfurt Fair risked being
robbed by bandits. In order to guard the tradesmen, the towns' people
would ride out, greet the vendors and offer them pewter pitchers of wine
and loads of crisp dough on their spears, called Geleit-pretzels.
The Whimsical
Pretzel shape worked its way into the culture not only as a reward but
as a symbol of Good Luck and prosperity. I suppose it had the same effect
as a logo did appearing in festivals and celebrations, as well as a quick
snack available from street corner vendors. Probably two of the most fascinating things about the pretzel is it was
served on Easter with 2 hard boiled eggs and hidden around the farms,
for the kids to find. This very likely was the forerunner of the Easter
egg hunt. Weddings in Europe for a time used the tradition of the bride
and groom tugging at a pretzel like a wishbone, the larger piece assured
the spouses fulfillment of their wishes.
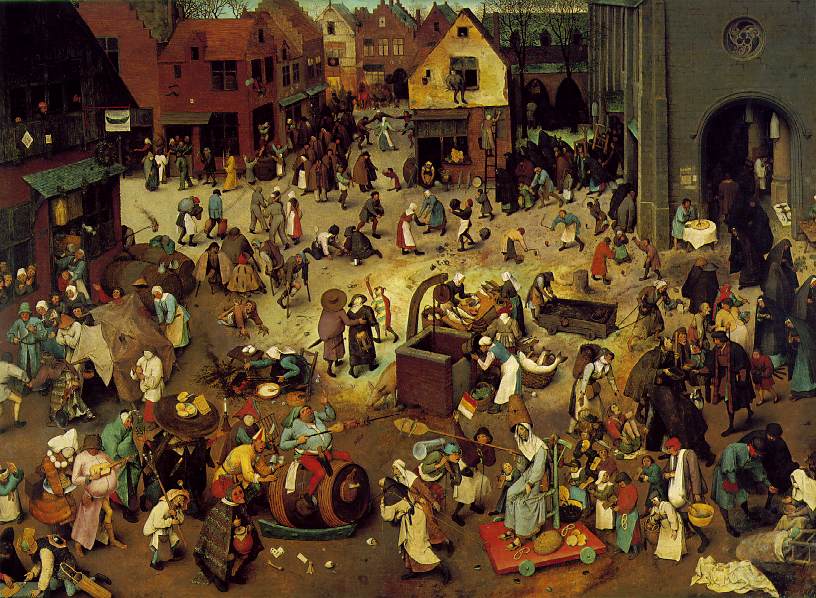
There are pictures
of pretzels in paintings that help us to find how old their existence
really is. Here is a one of the more famous pictures in which we find
pretzels, called "The f ight between
carnival and lent"
by Pieter Bruegel in 1559. You can see the pretzels around the woman on the red cart in the lower right
hand corner.
Click here to Subscribe to MenuMusings so you won't miss a thing!
Looking for more recipes?
Please visit my
Recipe Index for tons of great recipes to cook for/with your family!
Some
things are made from leftovers to stretch your budget, others are
totally from scratch, while others make use of convenience items for a
semi-homemade meal. I also have a wide array of ethnic recipes
represented.
Here are a few to pique your curiosity:
In the
bowl of a standing electric mixer, fitted with the dough hook
attachment, combine 3 3/4 cup bread flour with 2 tsp kosher salt, 1 1/4
tsp active dry yeast, 2 Tbsp softened butter, and the 1 1/2 cups warm
water. Knead at medium speed until the flour is evenly moistened, about
2 minutes. Increase the speed to high and knead until a smooth, elastic
dough forms around the hook, around 8 minutes.
Transfer the dough to a lightly
floured surface. Cover loosely with a dry kitchen towel and let it rest
for 5 minutes. Cut the dough into 8 equal pieces and form each one into
a ball. Cover the dough balls with the towel and let rest another 5
minutes.
On an unfloured surface, roll each ball into a long rope with tapered ends, around 18 - 22 inches long.
To shape each pretzel, form the rope
into a U shape. Cross the ends over each other twice to form the twist,
then bring the ends up to the bottom of the U and press the tips into
it. Arrange the pretzels on two large baking sheets lined with
parchment paper and let stand uncovered in a warm place for 45 minutes
until slightly risen. Refrigerate the pretzels uncovered for at least 2
hours or overnight.
Preheat
the oven to 400 degrees F. Dissolve 1/2 cup baking soda in 2 quarts of
boiling water (8 cups). Gently lower and boil the pretzels in the
water for 30 seconds, flipping them halfway through. Remove them and
drain briefly on a drying rack, then return them to the parchment paper
lined baking sheet.
For salted pretzels,
salt them and bake them now. Bake them on the top and middle racks
until shiny
brown (about 16 minutes), shifting the position of the pans
halfway through. Let them cool slightly on drying racks before serving.
Optional - if serving immediately, you may like to brush the tops with
melted butter. Yum. Buttery, salty, good!
For sweet pretzels,
bake them "naked." While baking, make a honey butter glaze with the
1/4 cup melted butter and 2 Tbsp honey. Separately, finely chop the
almonds, dry toast them in a pan, and mix the nuts with equal parts 1/4
cup granulated sugar and 1/4 cup brown sugar. After they are baked,
brush with the honey butter, sprinkle on the topping, and bake for an
additional 3 - 5 minutes to slightly caramelize the sugar on top. I
served these with a icing glaze of confectioner's sugar, a bit of
vanilla, a squeeze of lemon juice, and some cream to the desired
consistency.


