Sunday, July 17, 2011

Canon's Bug Cakelets

Well I'm not sure what Mrs Noah did on that ark for 40 days while it rained... but we cook. 

Canon's Bug Cakelets
A while back, I found this "bug" cakelet pan at Target.  I knew a rainy day would come!  I was a little scared of having all those nooks and crannies to deal with, but I sprayed it with Crisco with flour spray, and the bugs practically jumped out on their own.  Yay!


Bug cakelet pan

... in case you want to go out and pick one up.


Fill 2/3 full.


Let cook in pan 10 minutes.


Let the cakelets cool completely on a wire rack.
The recipe was SUPER simple and just delicious!
 2 1/4 cups flour
1 1/2 cups sugar
1/2 cup softened butter
1 1/4 cups milk
3 1/4 tsp baking powder
3/4 tsp salt
1 tsp vanilla
1/2 tsp almond extract
3 eggs


Now for this, I had to KEEP in mind that this was a CHILD's activity.  You know I would have spent hours placing each sprinkle if I were the one doing it for some function... but a rainy day activity is different.  These were Canon's project.

Trim the edges ... because we put a little too much batter.
This is the glaze we used.  I'm not crazy about it, and would recommend making your own glaze.. but we had it on hand and it was fast and easy.  You just warm it and then pour over the cakes. 

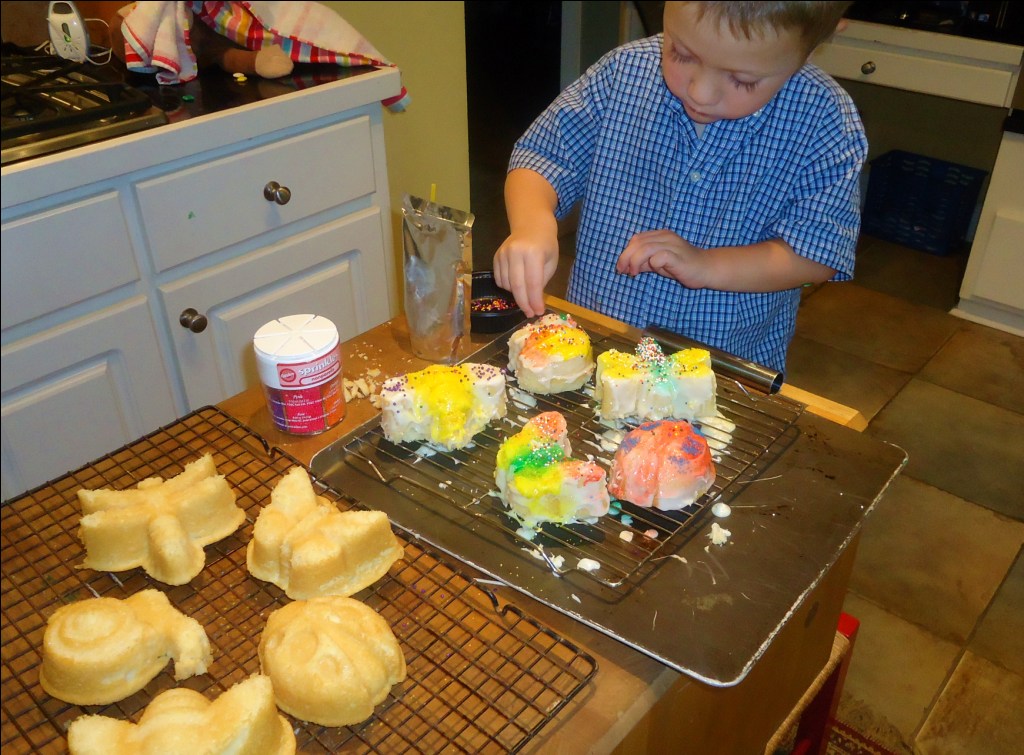
Decorate (Mom's... tie your hands behind your backs and resist the urge to make them perfect.  They call this "self talk" in therapy.)

Ta da!

For the second batch, Canon dusted them with powdered sugar.

Cute, huh?
Well... that was the rainy Sunday afternoon project.  I'm sure someone with cake decorating skills would make something really fabulous; but we just made time together.

Written Direction:
Heat oven to 350 degrees.  Grease and flour the pan; set aside.  In a large mixing bowl, combine all ingredients and blend on low speed, scraping the bowl often.  Beat on high for 3 minutes.  Pour the batter into the prepared pans (I used a ladle), filling wells 2/3 full; set asided remaining batter.  Bake 18 - 22 minutes (I did them for 18 minutes), until a toothpick comes out clean.  Remove from oven; cool for 10 minutes in the pan.  Invert the cakes onto a cooling rack and cool completely.  Wash, dry and prepare the pan again.  Repeat the procedure with remaining batter.  Frost and decorate as desired.  Makes 10 - 12 cakes.


Want more great recipes?
Please visit my Recipe Index for tons of ideas that you can cook with/for you family!  


Thursday, July 14, 2011

Mango Salsa

Fresh Mango Salsa
Good news!  It's mango season! So for the next few months, you should be able to find plentiful mangoes at the supermarket for a substantially lower price than usual.  Just today, I found them for 25 cents a piece when they are usually 94 cents a piece.  That's a big savings!   So tonight.... mango salsa to accompany a grilled pork tenderloin.

Just some trivia for you: Did you know that the mango is distantly related to the cashew, pistachio, poison ivy, and poison oak?  Some people could have an allergic reaction to a chemical in the stems and leaves, so if you have a contact dermatitis-type reaction to poison ivy/oak... you may want to have someone else prepare this for you.  Go figure!  The better news (other than being delicious), is that mangoes are loaded with protective nutrients like vitamins C and A, potassium, and copper; and as such, they're often referred to as "king of the fruit."

Ingredients:  These can not be given in exact measures, because the produce that I find is not always the same size.  They are approximations.
  • 2 large mangoes
  • a handful of red and yellow bell peppers and sweet onion
  • 1 small jalapeño, seeded and finely diced
  • handful of fresh cilantro, chopped
  • juice from 1 - 2 limes
  • 1 large clove of garlic, finely minced
  • handful of grape tomatoes, quartered
  • salt and pepper to taste 

Step-by-Step:
The mangos should "give" a little if they are ripe.. although they will still be quite firm.  To hasten the ripening process, you could put them in a bag overnight in the fridge.

There is a "proper" way of cutting a mango... but darned if I can ever figure it out.  They have a weird oblong pit in the middle, so you basically have to cut down both sides of it, then get extra pieces off.  The beauty of salsa, is that your chunks don't have to be uniform or pretty.  That's a positive for me.

One of my kitchen tips... whenever I have extra bell peppers and onions, I slice or dice them and pop them in a ziptop bag in the freezer.  This makes prep for other dishes (like this one) a snap.  The thawed, frozen peppers and onions break down a lot faster than the fresh ones.  For this recipe, I grabbed a handful of red and yellow bell peppers and sweet onion.  Also, the smallest jalapeño I had out there in the freezer.  I freeze them whole from the garden!  - pop in the microwave for 15-20 seconds and they are ready to be cut.  For this, I removed all the seeds and membrane to reduce the heat, but that batch of peppers was hot!  So I would say add this last in smaller quantities until you achieve the desired amount of heat.

A handful of fresh cilantro chopped over the fruit/veggies.  It wouldn't be salsa without cilantro!  Another kitchen tip - I store my cilantro in a glass of water in the fridge.  Keeps way longer.

The juice from 1 -2 limes.  Heat the limes 15-20 seconds in the microwave and roll them to get more juice out of them.

1 large clove of garlic, finely chopped.


Plus a small handful of cherry tomatoes, salt and pepper to taste.  Now is when you adjust all the seasonings to your liking.  Need more heat, acid, sugar even?  Let all these flavors marry at least 30 minutes before serving.

I served my mango salsa with a grilled pork tenderloin.  Pork goes very well with fruit.  This salsa would also be great with grilled fish, shrimp, etc.


Written Directions
Cutting a mango... they have a weird oblong pit in the middle, so you basically have to cut down both sides of it, then get extra pieces off.  The beauty of salsa, is that your chunks don't have to be uniform or pretty.  That's a positive for me.  For this recipe, I grabbed a handful of red and yellow bell peppers and sweet onion.  Also, the smallest jalapeño I had out there in the freezer.  I removed all the seeds and membrane to reduce the heat!  Add this last in smaller quantities until you achieve the desired amount of heat.  Add a handful of fresh cilantro chopped over the fruit/veggies.  It wouldn't be salsa without cilantro!  Add the juice from 1 -2 limes.  Heat the limes 15-20 seconds in the microwave and roll them to get more juice out of them.  Add 1 large clove of garlic, finely chopped.   Add a small handful of cherry tomatoes, salt and pepper to taste.  Now is when you adjust all the seasonings to your liking.  Need more heat, acid, sugar even?  Let all these flavors marry at least 30 minutes before serving.


Looking for more recipes?

Please visit my Recipe Index for tons of great recipes to cook for/with your family!  Some things are made from leftovers to stretch your budget, others are totally from scratch, while others make use of convenience items for a semi-homemade meal.  I also have a wide array of ethnic recipes represented.  Here are a few to pique your curiosity:


Tuesday, July 12, 2011

Sun Dried Tomato Pesto Spread

THIS one is a NO COOK recipe.  Other that heating up water, you are heat free!  I can't take credit for this recipe.  I adapted it from Runner's World because it looked so interesting. 

It was very easy to assemble, and would be great for tailgaiting or a grownup picnic.  I admit, I was skeptical when I read "mint" in this recipe... but I figured it must be there for some reason, so I went with it.  The pesto was very good.  This is very different from a traditional green "basil" pesto and definitely jazzed up the chicken sandwich. 

These thin sandwich "rounds" have only 100 calories each and are multigrain, so that's a plus.  The whole grain is touted to replenish muscle glycogen stores to prepare you for your next bout of exercise.  The fats in this recipe (walnuts, olive oil, avocado) are the heart healthy ones full of antioxidants.  I personally am a huge fan of these roasted red peppers.  They are awsome and balance out this mild chicken with a bit of a crunchy tang.. - and the whole thing was just darned tasty! 

Grocery List:
  • 1/2 cup     sundried tomatoes
  • 1/3 cup     roasted red peppers + more for sandwich
  • 1/4 cup     extra virgin olive oil
  • 2 large      garlic cloves
  • 1/4 cup     walnuts
  • 1/4 cup     fresh mint
  • 2 Tbsp      fresh oregano
  • warm water
  • a few shakes of cayenne pepper
  • salt to taste
  • Multigrain sandwich rounds... the real thin ones
  • avocado slices
  • leaf lettuce
  • rotisserie chicken


Step-by-Step:
All the goodies


Pesto Assembly:
Measure out the sundried tomatoes.  I like the ones that are chewy - not hard.


Soak them in warm/hot water for 30 minutes to soften.  Reserve the liquid.  Don't throw it away!


Strip the leaves off of the oregano and mint.

Nothing has to be finely minced or chopped because it's all going in to the food processor.

Just dump it all in.  Then add the oil and 1/4 cup reserved cooking water.

Let the food processor run until the pesto is smooth. 
And that's it!
 Sandwich Assembly:
 * This would also be great in a pita or a wrap.
Layer pesto, roasted rotisserie chicken, leaf lettuce, more drained roasted red peppers, avocado slices and more pesto.

Yummmm!

Written Directions:
Measure out the sundried tomatoes.  I like the ones that are chewy - not hard.
Soak them in warm/hot water for 30 minutes to soften.  Reserve the liquid.  Don't throw it away!Strip the leaves off of the oregano and mint.Just dump it all in the food processor.  Then add the oil and 1/4 cup reserved cooking water.


Looking for more recipes?
Please visit my Recipe Index for tons of great recipes to cook for/with your family!  Some things are made from leftovers to stretch your budget, others are totally from scratch, while others make use of convenience items for a semi-homemade meal.  I also have a wide array of ethnic recipes represented.  Here are a few to pique your curiosity:


Monday, July 11, 2011

Strawberry Napoleons

It was a stormy afternoon... good for nothing except gathering around and getting our hands in something.  I really had not planned on really "cooking" dinner tonight.  Hmmmmm.... what can we come up with?  You can find this recipe on the Peppridge Farm puff pastry box.  Delicious!!

I promise, these are so easy... you see the little ones helping me!

Ingredients:
  • 1 box puff pastry
  • 1 small package of instant vanilla pudding
  • 2 cups of milk.
  • 1/2 pint of heavy cream
  • ~ 1 tsp vanilla (I didn't measure)
  • some powdered sugar(to the sweetness you'd like)
  • flour for dusting board surface
  • fresh strawberries
  • chocolate for melting and drizzling
  • a bit more powdered sugar to garnish


Step-by-step:
Okay... you caught me cheating again! Mix 1 small package of instant vanilla pudding, 2 cups of milk.  Mix for 4 - 5 minutes. 
Making the custard filling

In a second bowl, whip together 1/2 pint of heavy cream, about a teaspoon of vanilla (I didn't measure any of this) and some powdered sugar (maybe half a cup?).  Whip for a while (start slowly) and you'll have a delicious sweet whipped cream.
The whipping cream
Stir the pudding just to make sure it feels right.  (This one got lots of stirring and licking)

Make sure you taste test along the way.

Fold the custard and whipped cream together gently.

So this will be the combined filling.  Set aside in the fridge.

Lightly flour a work surface.

Allow the puff pastry (Peppridge Farm) to sit out and thaw about 30 minutes, then fold out on to the floured surface.  Cut into thirds along the fold lines.

Put the three pieces onto a baking sheet and put into a preheated 400 degree oven.

Bake about 15 minutes until golden brown.

Cool on a wire cooking rack.

Split each one into two top/bottom pieces.

Now there are six pieces.

Cut each into thirds.

Layer a bottom piece with filling then sliced berries.

Add another layer.

Add a "top" piece.  Garnish with powdered sugar and a drizzle of chocolate.
* I used Hershey's syrup for this one b/c it was for Lily... who was getting impatient.

The tester.

Now for a little more grown up topping, melt a square of baker's semi-sweet chocolate in  a microwave safe bowl for 30 seconds at a time.  Stir in between each time.  After the second time, it should be melty enough.

This is with the real chocolate on top.
Ideally, have all the filling components cold when you assemble this.  Then right before serving, drizzle the chocolate.  - but it's messy to eat.  I'm warning you now.

Written Directions:

Mix in bowl:  1 small package of instant vanilla pudding, 2 cups of milk.  Mix for 4 - 5 minutes. 
In a  second bowl, whip together 1/2 pint of heavy cream, about a teaspoon of vanilla (I didn't measure any of this) and some powdered sugar (maybe half a cup?).  Whip for a while (start slowly) and you'll have a delicious sweet whipped cream. Fold the custard and whipped cream together gently. Set aside in the fridge. 

Lightly flour a work surface. Allow the puffy pastry to sit out and thaw about 30 minutes, then fold out on to the floured surface.  Cut into thirds along the fold lines. Put the three pieces onto a baking sheet and put into a preheated 400 degree oven. Bake about 15 minutes until golden brown. Cool on a wire cooking rack. 

Split each one into two top/ bottom pieces ( now there are 6) cut into thirds. Layer a bottom piece with filling then sliced berries. Add another layer. Add a "top" piece.  Garnish with powdered sugar and a drizzle of chocolate. Melt a square of baker's semi-sweet chocolate in  a microwave safe bowl for 30 seconds at a time.  Stir in between each time.  After the second time, it should be melty enough.

Looking for more easy recipes?  Please visit my Recipe Index for tons of ideas that you can make with/for you family.   Here are a few more "comfort food" ideas to get you started:

Roasted Green Beans  


Follow me on Pinterest

Follow Me on Pinterest