Pages

Friday, March 29, 2013

Tuscan Sunrise Breakfast Wraps

http://menumusings.blogspot.com/
On this particular beautiful spring morning, I found myself alone in the house.  Believe me when I tell you how rare that is!!  Oh to just lounge around for a while in my pj's and have no one to attend to is just delicious every now and then!  But since I had no little people to cook for, the cupboards were, well, bare!  This is one of those times when you search through the fridge to see what you can make out of "stuff."  Oh come on... you know exactly what I mean.  

This amazing breakfast wrap was the result.  Now don't get me wrong, those breakfast wraps that you grab through the fast food drive-through windows can fill you up, but they are also pretty basic and boring.  How about waking up your breakfast wrap with the piquant flavors of the Italian countryside?  I assure you that you probably will not find sun dried tomatoes, marinated artichoke hearts, and smoky ham coming out of a fast food bag!  I will be the first to admit, there is nothing particularly groundbreaking about a breakfast wrap.  But the addition of the marinated artichokes and sun dried tomatoes in this one really do make it something worth trying!

So here we go!  Now feel free to substitute seasonings and cheeses of your choice.  And don't worry about it if you are one of those who can't make an omlet look "right."  Wraps are so forgiving because you hide everything inside!

Ingredients:  (enough for 2 large wraps)
  • 3 large eggs
  • a splash of milk
  • salt, black pepper, dried basil
  • Italian seasoning 
  • smoky deli ham
  • marinated artichoke hearts, diced small
  • sun dried tomatoes packed in oil, cut small
  • good melting cheese - fontina, gruyere, mozzarella, You choose!
  • medium sized flour tortillas 


Step-by-Step:
Chop all the accompanying ingredients (ham, artichokes, tomatoes) and grate some cheese of your choice.   I had some gruyere already grated in the fridge, so I used that.  But other cheeses would work just as well.
sun dried tomatoes with herbs, smoked ham, marinated artichoke hearts
Add in a splash of milk to the eggs (sorry, I don't really measure).  Add salt, pepper, dried basil, Italian seasoning.  Briskly beat the eggs with a fork or whisk.  
3 large eggs
plus a splash of milk
plus salt, pepper, dried basil, Italian seasoning
whisk to combine
Over medium low heat, allow eggs to cook slowly in a nonstick pan. 
Once large soft curds are formed, add in the ham, artichokes, and tomatoes.  When eggs are just set and not "wet"any more, turn off the heat so the eggs won't brown on the bottom.  No one likes brown eggs!!!

Heat a flour tortilla over the stove or in the microwave.   When I do them over the fire like this, I love the way they start to blister and have the slightest bit of brown to them.  Plus - you don't want to put your lovely hot eggs into a cold wrapper!
flour tortillas

Add the eggs.  Top with a good melting cheese.  
Close up the wrap and garnish as you'd like - extra cheese, Italian Seasoning, chives, oregano, etc.   If you are making a few of these, you can heat them up a bit more in the microwave to get everything hot and melted right before serving them.
Now you can go grab a cup of steaming hot coffee, or fresh orange juice and go watch the world come alive.  


Written directions:
Briskly beat the eggs with a fork or whisk.    Add in a splash of milk (sorry, I don't really measure),
salt, pepper, dried basil, Italian seasoning.  Chop all the accompanying ingredients (ham, artichokes, tomatoes) and grate some cheese of your choice.  

Over medium low heat, allow eggs to cook slowly in a nonstick pan,  Once large soft curds are formed, add in the ham, artichokes, and tomatoes.  When eggs are just set and not "wet"any more, turn off the heat so the eggs won't brown on the bottom.  No one likes brown eggs!!!  

Heat a flour tortilla over the stove or in the microwave.  Add the eggs.  Top with a good melting cheese.  Close up the wrap and garnish as you'd like - extra cheese, Italian Seasoning, chives, oregano, etc.   If you are making a few of these, you can heat them up a bit more in the microwave to get everything hot and melted right before serving them.


Looking for delicious and easy ideas?  Please visit my Recipe Index for tons of things to cook with and for your family... or just for yourself!

Order the Menu Musings Cookbook! 
 
Here are a few things to get you started:


Click here to Subscribe to MenuMusings so you won't miss a thing!

Friday, March 22, 2013

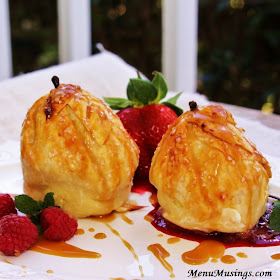
Cream Cheese Stuffed Pear Dumplings with Praline Sauce

http://menumusings.blogspot.com/
We had such a lovely day last Saturday planting our Spring garden out in the gorgeous weather.  Of course I had help!  Afterwards, we scrubbed the dirt from our hands and sat out on the front porch swing and enjoyed these amazing stuffed pear dumplings.  These may look fancy, but they are super simple to make.  Just peel and core, stuff, wrap, and bake the pears.  I'm sure apples would work will as well if that is your preference.  

You could also top them as you choose - it's YOUR dish!  My first topping is a praline sauce.  By all means, if you have any left over, save it for topping your ice cream.  DeLISH!!  The second, because I have a little girl who adores berries, is a mixed berry sauce (This one would be fabulous over pancakes as well).  And who knew that they would work so well together! - one silky, creamy and sweet, the other with a slight tartness to brighten up the bite.   

As always, I'll take you through each step of what I did.  By the way, the sauces could easily be made ahead of time and stored in the refrigerator until you need them.  Just heat them up before serving.


Ingredients:  (for 4 pears)         Click for Printable Recipe
  • Pears (you can also use apples)
    • 4 red d'Anjou pears
    • 1 box of Pillsbury roll out pie crust
    • 8 oz reduced fat cream cheese, softened
    • 4 Tbsp powdered sugar (confectioner's sugar)
    • 1 egg white + 1 Tbsp water for an egg wash
    • decorating sugar
  • Praline Sauce
    • 4 Tbsp butter
    • 3/4 cup brown sugar
    • 1/2 cup canned evaporated milk (or you can use heavy cream)
    • 1/2 tsp vanilla (I always use clear Mexican vanilla)
  • Berry Sauce
    • 1 cup frozen mixed berries 
    • 2 Tbsp raspberry preserves
    • 1/2 cup granulated sugar

Step-by-Step:
Mix your filling before preparing the pears so they won't sit and oxidize (brown).   Mix the softened cream cheese and the confectioner's sugar.  That's all there is to it!
8 oz cream cheese + 4 Tbsp confectioner's sugar
Peel the pears.  Do NOT remove the stem!

Remove a small slice from the bottom of the pears so they will sit flat.
Core the pears to remove as much of the core and seeds as you can without disturbing the stem.   I found that a melon baller worked great for this job.
Unroll the pie crust on a lightly floured surface.
You'll want to roll it out a bit larger than it already is, but don't get it too thin.
Cut out a circle in the dough using a paring knife.  I used a bowl because I doubt I could cut a perfect circle by eye!  Do whatever works for you.
 
Fill the pears with the cream cheese mixture using a narrow spoon.  (I think I may have used one of Lily's spoons.)


Wrap the pear in the pastry crust one side at a time, brushing lightly with the egg wash so it will stick together.  For the egg wash, just mix together an egg white and water.
Continue in one direction around the pear until it's all wrapped up.
Sprinkle with large decorating sugar.  They just make it so pretty!  I knew that I'd better do it over a bowl or else it would be everywhere!  HaHa
Now out of any left over pastry crust, cut out some "leaves." Apply them using the egg wash to "glue" them to the crust.  Sugar them as well so they won't feel left out.  Set the pears in a baking dish that you have lined with parchment paper.  You do not want them to stick, and this will make your cleanup a snap!  

Cover the stems with little bits of aluminum foil.  You don't want them to burn.  Bake at 400 F for about 40 minutes.
For the last 10 minutes, I covered the tops loosely with aluminum foil so the bottom parts would brown a little more.


For the Praline Sauce.
Melt butter into a saucepan.
4 Tbsp butter
Add brown sugar and let it all come to a nice bubbling mess!
3/4 cup brown sugar
Add in the evaporated milk or cream.
1/2 cup evaporated milk
Add in the vanilla.
1/2 tsp good quality vanilla
Bring to a nice boil and the thickeners will start to do their work.  Then you can bring the heat back down to maybe medium, letting it bubble gently until it has reduced and thickened to a nice syrup.  This will probably take about 10 minutes.  You don't want to overcook it, or you will actually make praline candy.  Set aside and let it cool a bit or you will blister someone's mouth!  You want to serve warm, not hot.

Now for the Berry Sauce.
Grab a bag of frozen mixed berries from the freezer and dump some into a saucepan.  Yes, you can certainly use fresh if you have them on hand.
1 cup mixed berries
Add in the preserves.  They will act as a thickening agent because of the pectin in them.
2 Tbsp raspberry preserves
Add in some sugar if you want the berries to be a bit less tart.
1/2 cup granulated sugar
Allow them to come to a boil and cook down for a while.
I used a potato masher to break up the larger berries.  It's still a little bit chunky, but the strawberries were huge.  The consistency of the final sauce is totally up to you.

Allow to cook down and reduce until syrupy.  Then set aside to cool.
Serve.
Top the baked pears with a bit of each sauce.  You can make a bed of the berry sauce, then drizzle the praline sauce over the top if you wish.  Or serve either one alone... or serve them totally naked!  The point is to have fun with it and please the palates of whomever you are serving.  Garnish with extra fresh berries and sprigs of mint. 

The whole point is to enjoy them with someone you love. 


And just so you know... we really were out planting.  We filled containers out on the deck as well as the garden and flowers by the garage just for good measure.  I don't just make up these stories!  Ha!


We'll need lots of tomatoes!

I hope you have enjoyed this recipe.  If you'd like to see more of what we cook around here, please visit my Recipe Index.  There are tons of ideas on there of things you can cook for/with your family.

Order the Menu Musings Cookbook! 
 
Here are a few things to pique your curiosity:


Click here to Subscribe to MenuMusings so you won't miss a thing!