Pages

Wednesday, August 31, 2011

Strawberry Vanilla Bean Pancake Sauce


What could be better than waking up to the smell of pancakes in the morning?  For my kids, it's THE breakfast of choice!  Some people like great big pancakes, but my kids like the mini pancakes best.  I make them about the size of a silver dollar.  They've figured out that this is the ideal "dipping" size. 

This morning, I made a sweet, fragrant strawberry vanilla bean sauce for the pancakes to be dunked into.  Mmmm... warm, ooey gooey goodness to get everyone's day off to an even sweeter start!  

Print this recipe!

Ingredients:
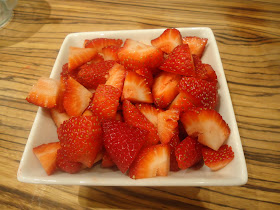
  • 2 cups fresh strawberries, rinsed and chopped 
  • 1/3 cup sugar 
  • juice of 1/2 lemon 
  • the "seeds" (caviar) from one vanilla beans 
  • 1/4 - 1/2 tsp cornstarch 
 
Method:  Cut up about 2 cups of fresh strawberries.   To the strawberries, add:  sugar, lemon juice, vanilla bean seeds, and cornstarch.  Cook on medium until thick and bubbly.  The strawberries will release their juices, break down and mush up.  Add the cornstarch in a little slurry and cook until thick.  
 
Step-by-Step:
Cut up about 2 cups of fresh strawberries.   To the strawberries, add:  sugar, lemon juice, vanilla bean seeds, and cornstarch.  Cook on medium until thick and bubbly.  The strawberries will release their juices, break down and mush up.  Add the cornstarch in a little slurry and cook until thick. 
2 cups fresh strawberries, chopped
1/3 cup sugar
juice of 1/2 lemon (or a bit of orange juice)
To remove the vanilla bean "caviar," split the vanilla bean down the center with a sharp knife.  Scrape the edge of a knife along the inner surface of the vanilla bean pod.  After you add the vanilla bean "caviar" to the sauce, I just throw the whole pod in there for a while.  I want to make sure I get all of those wonderful seeds in there.  They are super fragrant!

Cook on medium until thick and bubbly.  The strawberries will release their juices, break down and mush up.   You can use a potato masher to break down the strawberries or leave it chunky if you want.  You could also puree the sauce in a blender if you wanted it really smooth.
Add the cornstarch.  I mixed it with about a tablespoon or so of water first, so it wouldn't get lumpy. 

Then cook until thick.... and that's it!!!

Here's our satisfied customer!

I hope you have enjoyed this recipe.  If you'd like to see more of what we cook around here, please visit my Recipe Index.  There are tons of ideas on there of things you can cook for/with your family.

Connect with me:  If you haven't already, Click here to subscribe to MenuMusings.   You can also follow me on Pinterest as well as on the MenuMusings Facebook page.

Here are a few recipes to pique your curiosity:
Dill and Sun Dried Tomato Cucumber Rolls
Food Notes: (Wikipedia)
Vanilla is a flavoring derived from orchids of the genus Vanilla, which is native to Mexico. Etymologically, vanilla derives from the Spanish word "vainilla," little pod.  Attempts to cultivate the vanilla plant outside Mexico and Central America proved futile because of the symbiotic relationship between the vine that produced the vanilla orchid and the local species of Melipona bee; it was not until 1837 that Belgian botanist Charles François Antoine Morren discovered this fact and pioneered a method of artificially pollinating the plant. The method proved financially unworkable and was not deployed commercially. In 1841, Edmond Albius, a 12-year-old slave who lived on the French island of Réunion in the Indian Ocean, discovered the plant could be hand pollinated. Hand pollination allowed global cultivation of the plant.

There are currently three major cultivars of vanilla grown globally, all of which derive from a species originally found in Mesoamerica.  The majority of the world's vanilla is the V. planifolia variety, more commonly known as Bourbon vanilla or Madagascar vanilla, which is produced in Madagascar and neighboring islands in the southwestern Indian Ocean, and in Indonesia.

Vanilla is the second most expensive spice after saffron, because growing the vanilla seed pods is labor intensive. Despite the expense, vanilla is highly valued for its flavor, "pure, spicy, and delicate" and its complex floral aroma. As a result, vanilla is widely used in both commercial and domestic baking, perfume manufacture and aromatherapy.

Monday, August 29, 2011

Bacon Wrapped Jalapeño Poppers

Well I'm certainly not the originator of this recipe... but I was glad to be a recipient!  This is a balanced mouthful of hot, sweet, creamy, crunchy, smokey goodness!  Great for watching that big football game.

This is a GALLON sized zip top bag full of jalapeños!  That's a lot of collective heat!!  The lady that keeps my two toddlers during the day has them growing in her garden and keeps me stocked up.  (Hey... every little bit helps with that grocery bill!). Jalapeños freeze wonderfully - you don't need to cut them or anything.  Just throw them whole into the freezer.
  
So this afternoon, I decided to make bacon wrapped jalapeño poppers.  Mmmm.  I took out 18 peppers for this recipe.
To get the ice crystals off, I just gave them a quick bath in a bowl of cool water.  Easy enough, huh?
So at this point.... maybe it would be a good idea to put on a pair of latex gloves.  You'll thank me later.  The heat won't get you right away; but in about an hour, it'll start creeping in on you.... and set up house for several hours. 

Next, first, cut the peppers in half.  Try to cut "through" the stem.  It looks prettier and gives you a handy dandy little handle to pick them up with when they're done.
Pull out all the seeds and the white membrane.  If you want them to be spicier, feel free to leave as much of this in as you desire... but these are home grown peppers and they didn't need any help with getting hotter!

Notice this is NOT a gloved hand.  That's why I'm forewarning you to wear gloves.
Next, I soaked the gutted peppers in milk for a a while - I actually just dropped them in as I went along.  I wanted to remove a bit more of the bite from these hot beauties.
Now comes the filling:
  • one package of cream cheese
  • one granny smith apple
  • a nice handful of fresh green onions
Chop the apples to a small-medium dice.  I know at this point some of you are scoffing at the addition of the apple.  Don't.  It's darned good in there!
Chop the green onions fairly small.  I make quick work of this with my kitchen shears... which I use ALL of the time.  This is much easier than chopping them with a knife. (Did I mention how much money you can save by growing your own green onions?  You almost can't kill them.)
Mix.
Fill. (Heap!)
Wrap.
For this recipe, I used a maple flavored bacon.  Cutting each strip of bacon into thirds was just about the right length to wrap the peppers.

Secure with a toothpick.  Do not wrap them too tight - as the bacon with contract during baking.
This makes a bunch - so choose a nice sized pan.
Bake at 350 degrees for an hour.  Yes - it does take a long time, but you don't want soggy bacon.   It should be nice and brown and crispy and fragrant.
Let them sit for about 10 minutes.
Yum!  

Written Method:

This is a GALLON sized zip top bag full of jalapeños!  That's a lot of collective heat!!  The lady that keeps my two toddlers during the day has them growing in her garden and keeps me stocked up.  (Hey... every little bit helps with that grocery bill!). Jalapeños freeze wonderfully - you don't need to cut them or anything.  Just throw them whole into the freezer.

So this afternoon, I decided to make bacon wrapped jalapeño poppers.  Mmmm.  I took out 18 peppers for this recipe.

To get the ice crystals off, I just gave them a quick bath in a bowl of cool water.  Easy enough, huh?

So at this point.... maybe it would be a good idea to put on a pair of latex gloves.  You'll thank me later.  The heat won't get you right away; but in about an hour, it'll start creeping in on you.... and set up house for several hours. 

Next, first, cut the peppers in half.  Try to cut "through" the stem.  It looks prettier and gives you a handy dandy little handle to pick them up with when they're done.

Pull out all the seeds and the white membrane.  If you want them to be spicier, feel free to leave as much of this in as you desire... but these are home grown peppers and they didn't need any help with getting hotter!

Notice this is NOT a gloved hand.  That's why I'm forewarning you to wear gloves.

Next, I soaked the gutted peppers in milk for a a while - I actually just dropped them in as I went along.  I wanted to remove a bit more of the bite from these hot beauties.

Now comes the filling:
  • one package of cream cheese
  • one granny smith apple
  • a nice handful of fresh green onions

Chop the apples to a small-medium dice.  I know at this point some of you are scoffing at the addition of the apple.  Don't.  It's darned good in there!

Chop the green onions fairly small.  I make quick work of this with my kitchen shears... which I use ALL of the time.  This is much easier than chopping them with a knife. (Did I mention how much money you can save by growing your own green onions?  You almost can't kill them.)

Mix.

Fill. (Heap!)

Wrap.
For this recipe, I used a maple flavored bacon.  Cutting each strip of bacon into thirds was just about the right length to wrap the peppers.

Secure with a toothpick.  Do not wrap them too tight - as the bacon with contract during baking.

This makes a bunch - so choose a nice sized pan.

Bake at 350 degrees for an hour.  Yes - it does take a long time, but you don't want soggy bacon.   It should be nice and brown and crispy and fragrant.

Let them sit for about 10 minutes.

Food Notes:
The larger peppers are often milder (less hot) than the small baby ones.  If you are growing your own, you can let them mature (they will turn red) into a sweeter, milder version. - the mellow in their old age compared to the hot tempered adolescent ones!

Also - let them sit out (uncovered) to serve.  The air helps the bacon to maintain its crispness.  If you put them in something airtight, the bacon will soften up.  That will still be okay, but the crisp bacon is much better.

Although I'm usually a huge advocate of cooking with your kids, I don't recommend it for this recipe.  It drove my daughter absolutely nuts that she couldn't help with this.  I was very concerned that she would touch something that had been in contact with the peppers then rub her eye or something.  And these peppers are just way too hot for little ones to be handling.

Saturday, August 27, 2011

Oeufs en Cocotte

That’s a fancy name for eggs baked in a cup or ramekin.

Oeufs en Cocotte
The word "oeuf" is French for "egg." Probably most people know that; but the word "cocotte" was a new one from me.   The variety of definitions for cocotte are hilarious.  Wonder how it came to mean ramekin?!

co·cotte  (kô-kôt) n.
1. (Cookery) a small fireproof dish in which individual portions of food are cooked and served
2. a prostitute or promiscuous woman
3. feminine diminutive of coq, cock, from Old French.

Let's just assume we are going with the first definition here... for the sake of having four kids running around my kitchen!

Okay... so this is the most ridiculously easy thing you could possibly make for breakfast or brunch, and lends itself to a gazillion different variations for the individual personalities in your house.  You could just add any combination of flavors you dream up, throw it in the oven, and sit and have that second cup of coffee.  Actually, I just set out to make some eggs-in-a-cup with some cool ingredients and then found out it had this wonderfully cool name!  I'm so glad, because it makes it sound really fancy! :-)

  • Preheat the oven to 350 degrees.
  • I got out a couple of eggs (although my daughter insisted that she had to have one of them) and found various wonderful ingredients in the fridge that needed to join a good party.
    • some fresh baby spinach
    • some sweet and juicy grape tomatoes
    • a couple of sprigs of fresh thyme
    • some crumbled tomato-basil feta cheese
    • and of course some bacon.. which is getting itself crisped up during this photo shoot.
  • Chop a handful of spinach
  • Add to an oven safe ramekin
  • Add the beaten egg mixture
    • two eggs
    • a little milk or cream
    • salt and pepper
    • the small thyme leaves, stripped from the stems
  • Crisp up some bacon (or just take a piece from the mountain of bacon that you've just made for your kids)
  • Chop into small pieces. 
  • Add some crumbled bacon over the eggs (because this makes everything better)
  • Add the chopped tomatoes
  • Sprinkle some crumbled feta cheese over the top
  • Add maybe a little more pepper and get this baby ready to stick in the oven
  • I put it on a baking sheet in the oven - mostly for easy transport.
  • Bake at 350 degrees for about 20 minutes.  
  • It will be soft and custardy.... but wonderful and savory at the same time.
  •  And yes, it was truly as great as it looks!  Lots of color.  Lots of nutrition.  Lots of yummy!
  • These would be great as an assembly line "make it yourself" meal with different "toppings" to choose from.  Because the breakfast kitchen can be wild and wonderful in the mornings.
    • Spanish - chorizo, cojita cheese, green chilis
    • Italian - cooked, crumbled Italian sausage, Parmesan cheese
    • Ham and swiss
    • Leeks and onions
    • endless combinations!
  • One thing to keep in mind is that different cheeses will add different amounts of saltiness.  So season according. 
  • I know this is probably not the traditional preparation for this dish (Julia Child would probably not approve), but it certainly was lovely!
 Written Method:
Okay... so this is the most ridiculously easy thing you could possibly make for breakfast or brunch, and lends itself to a gazillion different variations for the individual personalities in your house.  You could just add any combination of flavors you dream up, throw it in the oven, and sit and have that second cup of coffee.  Actually, I just set out to make some eggs-in-a-cup with some cool ingredients and then found out it had this wonderfully cool name!  I'm so glad, because it makes it sound really fancy! :-)
  • Preheat the oven to 350 degrees.
  • I got out a couple of eggs (although my daughter insisted that she had to have one of them) and found various wonderful ingredients in the fridge that needed to join a good party.
    • some fresh baby spinach
    • some sweet and juicy grape tomatoes
    • a couple of sprigs of fresh thyme
    • some crumbled tomato-basil feta cheese
    • and of course some bacon.. which is getting itself crisped up during this photo shoot.
  • Chop a handful of spinach
  • Add to an oven safe ramekin
  • Add the beaten egg mixture
    • two eggs
    • a little milk or cream
    • salt and pepper
    • the small thyme leaves, stripped from the stems
  • Crisp up some bacon (or just take a piece from the mountain of bacon that you've just made for your kids)
  • Chop into small pieces. 
  • Add some crumbled bacon over the eggs (because this makes everything better)
  • Add the chopped tomatoes
  • Sprinkle some crumbled feta cheese over the top
  • Add maybe a little more pepper and get this baby ready to stick in the oven
  • I put it on a baking sheet in the oven - mostly for easy transport.
  • Bake at 350 degrees for about 20 minutes.  
  • It will be soft and custardy.... but wonderful and savory at the same time.
  •  And yes, it was truly as great as it looks!  Lots of color.  Lots of nutrition.  Lots of yummy!
  • These would be great as an assembly line "make it yourself" meal with different "toppings" to choose from.  Because the breakfast kitchen can be wild and wonderful in the mornings.
    • Spanish - chorizo, cojita cheese, green chilis
    • Italian - cooked, crumbled Italian sausage, Parmesan cheese
    • Ham and swiss
    • Leeks and onions
    • endless combinations!

Friday, August 26, 2011

Pork Loin Chops with Peach-Ginger Chutney

A fabulous addition to the "end of summer" bounty of fresh produce that we have.... juicy peaches, spicy ginger, bright verdant thyme, yummm... all topping a thick juicy grilled pork loin chop.  - and of course what would summer be without throwing some crisp and sugary sweet ears of corn on the grill as well?!

Ingredients:
2 medium peaches
1 3-inch piece of fresh ginger
1 large shallot, chopped
2 Tbsp granulated sugar
1-2 large sprigs fresh thyme
Kosher salt and freshly ground black pepper
1/3 cup water


    Written Method:
    • Peel, pit, and chop the pieces into chunks about 1" each.
    • Peel the ginger (use the edge of a spoon) and cut into thick coins.
      • use less if you don't want it to be as spicy.  3" of ginger is pretty spicy!!
    • Combine the peaches, ginger, shallot, sugar, thyme sprig fresh thyme
      • do not remove the leaves from the sprig
    • Add a pinch of salt and pepper and the water.
    • Bring to a boil over medium-high heat.
    • Cover, reduce the heat to low, and simmer about 20 minutes.
      • until the peaches have softened (collapsed) and released their juices.
      • stir occasionally
      • adjust liquid and sugar balance as desired
    • Discard the ginger pieces and the thyme sprigs.
    • Cover and set aside.
    • Serve on top of thick grilled pork loin chops.
    Looking for delicious and easy ideas?  Please visit my Recipe Index for tons of things to cook with and for your family... or just for yourself!  Here are a few things to get you started: